
11-十一、Spring AOP 源码分析 – 拦截器链的执行过程
1.简介
本篇文章是 AOP 源码分析系列文章的最后一篇文章,在前面的两篇文章中,我分别介绍了 Spring AOP 是如何为目标 bean 筛选合适的通知器,以及如何创建代理对象的过程。现在我们的得到了 bean 的代理对象,且通知也以合适的方式插在了目标方法的前后。
接下来要做的事情,就是执行通知逻辑了。通知可能在目标方法前执行,也可能在目标方法后执行。具体的执行时机,取决于用户的配置。当目标方法被多个通知匹配到时,Spring 通过引入拦截器链来保证每个通知的正常执行。
在本文中,我们将会通过源码了解到 Spring 是如何支持 expose-proxy 属性的,以及通知与拦截器之间的关系,拦截器链的执行过程等。和上一篇文章一样,在进行源码分析前,我们先来了解一些背景知识。好了,下面进入正题吧。
2.背景知识
关于 expose-proxy,我们先来说说它有什么用,然后再来说说怎么用。Spring 引入 expose-proxy 特性是为了解决目标方法调用同对象中其他方法时,其他方法的切面逻辑无法执行的问题。
这个解释可能不好理解,不直观。那下面我来演示一下它的用法,大家就知道是怎么回事了。
我们先来看看 expose-proxy 是怎样配置的,如下:
<bean id="hello" class="xyz.coolblog.aop.Hello"/>
<bean id="aopCode" class="xyz.coolblog.aop.AopCode"/>
<aop:aspectj-autoproxy expose-proxy="true" />
<aop:config expose-proxy="true">
    <aop:aspect id="myaspect" ref="aopCode">
        <aop:pointcut id="helloPointcut" expression="execution(* xyz.coolblog.aop.*.hello*(..))" />
        <aop:before method="before" pointcut-ref="helloPointcut" />
    </aop:aspect>
</aop:config>
如上,expose-proxy 可配置在<aop:config/> 和 <aop:aspectj-autoproxy /> 标签上。在使用 expose-proxy 时,需要对内部调用进行改造,比如:
public class Hello implements IHello {
    @Override
    public void hello() {
        System.out.println("hello");
        this.hello("world");
    }
    @Override
    public void hello(String hello) {
        System.out.println("hello " +  hello);
    }
}
hello()方法调用了同类中的另一个方法hello(String),此时hello(String)上的切面逻辑就无法执行了。这里,我们要对hello()方法进行改造,强制它调用代理对象中的hello(String)。改造结果如下:
public class Hello implements IHello {
    @Override
    public void hello() {
        System.out.println("hello");
        ((IHello) AopContext.currentProxy()).hello("world");
    }
    @Override
    public void hello(String hello) {
        System.out.println("hello " +  hello);
    }
}
如上,AopContext.currentProxy()用于获取当前的代理对象。当 expose-proxy 被配置为 true 时,该代理对象会被放入 ThreadLocal 中。关于 expose-proxy,这里先说这么多,后面分析源码时会再次提及。
3.源码分析
本章所分析的源码来自 JdkDynamicAopProxy,至于 CglibAopProxy 中的源码,大家若有兴趣可以自己去看一下。
3.1 JDK 动态代理逻辑分析
本节,我来分析一下 JDK 动态代理逻辑。对于 JDK 动态代理,代理逻辑封装在 InvocationHandler 接口实现类的 invoke 方法中。JdkDynamicAopProxy 实现了 InvocationHandler 接口,下面我们就来分析一下 JdkDynamicAopProxy 的 invoke 方法。如下:
public Object invoke(Object proxy, Method method, Object[] args) throws Throwable {
    MethodInvocation invocation;
    Object oldProxy = null;
    boolean setProxyContext = false;
    TargetSource targetSource = this.advised.targetSource;
    Class<?> targetClass = null;
    Object target = null;
    try {
        // 省略部分代码
        Object retVal;
        // 如果 expose-proxy 属性为 true,则暴露代理对象
        if (this.advised.exposeProxy) {
            // 向 AopContext 中设置代理对象
            oldProxy = AopContext.setCurrentProxy(proxy);
            setProxyContext = true;
        }
        // 获取适合当前方法的拦截器
        List<Object> chain = this.advised.getInterceptorsAndDynamicInterceptionAdvice(method, targetClass);
        // 如果拦截器链为空,则直接执行目标方法
        if (chain.isEmpty()) {
            Object[] argsToUse = AopProxyUtils.adaptArgumentsIfNecessary(method, args);
            // 通过反射执行目标方法
            retVal = AopUtils.invokeJoinpointUsingReflection(target, method, argsToUse);
        }
        else {
            // 创建一个方法调用器,并将拦截器链传入其中
            invocation = new ReflectiveMethodInvocation(proxy, target, method, args, targetClass, chain);
            // 执行拦截器链
            retVal = invocation.proceed();
        }
        // 获取方法返回值类型
        Class<?> returnType = method.getReturnType();
        if (retVal != null && retVal == target &&
                returnType != Object.class && returnType.isInstance(proxy) &&
                !RawTargetAccess.class.isAssignableFrom(method.getDeclaringClass())) {
            // 如果方法返回值为 this,即 return this; 则将代理对象 proxy 赋值给 retVal
            retVal = proxy;
        }
        // 如果返回值类型为基础类型,比如 int,long 等,当返回值为 null,抛出异常
        else if (retVal == null && returnType != Void.TYPE && returnType.isPrimitive()) {
            throw new AopInvocationException(
                    "Null return value from advice does not match primitive return type for: " + method);
        }
        return retVal;
    }
    finally {
        if (target != null && !targetSource.isStatic()) {
            targetSource.releaseTarget(target);
        }
        if (setProxyContext) {
            AopContext.setCurrentProxy(oldProxy);
        }
    }
}
如上,上面的代码我做了比较详细的注释。下面我们来总结一下 invoke 方法的执行流程,如下:
- 检测
expose-proxy是否为true,若为true,则暴露代理对象 - 获取适合当前方法的拦截器
- 如果拦截器链为空,则直接通过反射执行目标方法
- 若拦截器链不为空,则创建方法调用
ReflectiveMethodInvocation对象 - 调用
ReflectiveMethodInvocation对象的proceed()方法启动拦截器链 - 处理返回值,并返回该值
在以上6步中,我们重点关注第2步和第5步中的逻辑。第2步用于获取拦截器链,第5步则是启动拦截器链。下面先来分析获取拦截器链的过程。
3.2 获取所有的拦截器
所谓的拦截器,顾名思义,是指用于对目标方法的调用进行拦截的一种工具。拦截器的源码比较简单,所以我们直接看源码好了。下面以前置通知拦截器为例,如下:
public class MethodBeforeAdviceInterceptor implements MethodInterceptor, Serializable {

    /** 前置通知 */
    private MethodBeforeAdvice advice;
    public MethodBeforeAdviceInterceptor(MethodBeforeAdvice advice) {
        Assert.notNull(advice, "Advice must not be null");
        this.advice = advice;
    }
    @Override
    public Object invoke(MethodInvocation mi) throws Throwable {
        // 执行前置通知逻辑
        this.advice.before(mi.getMethod(), mi.getArguments(), mi.getThis());
        // 通过 MethodInvocation 调用下一个拦截器,若所有拦截器均执行完,则调用目标方法
        return mi.proceed();
    }
}
如上,前置通知的逻辑在目标方法执行前被执行。这里先简单向大家介绍一下拦截器是什么,关于拦截器更多的描述将放在下一节中。
本节我们先来看看如何如何获取拦截器,如下:
public List<Object> getInterceptorsAndDynamicInterceptionAdvice(Method method, Class<?> targetClass) {
    MethodCacheKey cacheKey = new MethodCacheKey(method);
    // 从缓存中获取
    List<Object> cached = this.methodCache.get(cacheKey);
    // 缓存未命中,则进行下一步处理
    if (cached == null) {
        // 获取所有的拦截器
        cached = this.advisorChainFactory.getInterceptorsAndDynamicInterceptionAdvice(
                this, method, targetClass);
        // 存入缓存
        this.methodCache.put(cacheKey, cached);
    }
    return cached;
}
public List<Object> getInterceptorsAndDynamicInterceptionAdvice(
        Advised config, Method method, Class<?> targetClass) {
    List<Object> interceptorList = new ArrayList<Object>(config.getAdvisors().length);
    Class<?> actualClass = (targetClass != null ? targetClass : method.getDeclaringClass());
    boolean hasIntroductions = hasMatchingIntroductions(config, actualClass);
    // registry 为 DefaultAdvisorAdapterRegistry 类型
    AdvisorAdapterRegistry registry = GlobalAdvisorAdapterRegistry.getInstance();
    // 遍历通知器列表
    for (Advisor advisor : config.getAdvisors()) {
        if (advisor instanceof PointcutAdvisor) {
            PointcutAdvisor pointcutAdvisor = (PointcutAdvisor) advisor;
            /*
             * 调用 ClassFilter 对 bean 类型进行匹配,无法匹配则说明当前通知器
             * 不适合应用在当前 bean 上
             */
            if (config.isPreFiltered() || pointcutAdvisor.getPointcut().getClassFilter().matches(actualClass)) {
                // 将 advisor 中的 advice 转成相应的拦截器
                MethodInterceptor[] interceptors = registry.getInterceptors(advisor);
                MethodMatcher mm = pointcutAdvisor.getPointcut().getMethodMatcher();
                // 通过方法匹配器对目标方法进行匹配
                if (MethodMatchers.matches(mm, method, actualClass, hasIntroductions)) {
                    // 若 isRuntime 返回 true,则表明 MethodMatcher 要在运行时做一些检测
                    if (mm.isRuntime()) {
                        for (MethodInterceptor interceptor : interceptors) {
                            interceptorList.add(new InterceptorAndDynamicMethodMatcher(interceptor, mm));
                        }
                    }
                    else {
                        interceptorList.addAll(Arrays.asList(interceptors));
                    }
                }
            }
        }
        else if (advisor instanceof IntroductionAdvisor) {
            IntroductionAdvisor ia = (IntroductionAdvisor) advisor;
            // IntroductionAdvisor 类型的通知器,仅需进行类级别的匹配即可
            if (config.isPreFiltered() || ia.getClassFilter().matches(actualClass)) {
                Interceptor[] interceptors = registry.getInterceptors(advisor);
                interceptorList.addAll(Arrays.asList(interceptors));
            }
        }
        else {
            Interceptor[] interceptors = registry.getInterceptors(advisor);
            interceptorList.addAll(Arrays.asList(interceptors));
        }
    }
    return interceptorList;
}
public MethodInterceptor[] getInterceptors(Advisor advisor) throws UnknownAdviceTypeException {
    List<MethodInterceptor> interceptors = new ArrayList<MethodInterceptor>(3);
    Advice advice = advisor.getAdvice();
    /*
     * 若 advice 是 MethodInterceptor 类型的,直接添加到 interceptors 中即可。
     * 比如 AspectJAfterAdvice 就实现了 MethodInterceptor 接口
     */
    if (advice instanceof MethodInterceptor) {
        interceptors.add((MethodInterceptor) advice);
    }
    /*
     * 对于 AspectJMethodBeforeAdvice 等类型的通知,由于没有实现 MethodInterceptor
     * 接口,所以这里需要通过适配器进行转换
     */
    for (AdvisorAdapter adapter : this.adapters) {
        if (adapter.supportsAdvice(advice)) {
            interceptors.add(adapter.getInterceptor(advisor));
        }
    }
    if (interceptors.isEmpty()) {
        throw new UnknownAdviceTypeException(advisor.getAdvice());
    }
    return interceptors.toArray(new MethodInterceptor[interceptors.size()]);
}
以上就是获取拦截器的过程,代码有点长,不过好在逻辑不是很复杂。这里简单总结一下以上源码的执行过程,如下:
- 从缓存中获取当前方法的拦截器链
- 若缓存未命中,则调用
getInterceptorsAndDynamicInterceptionAdvice获取拦截器链 - 遍历通知器列表
- 对于
PointcutAdvisor类型的通知器,这里要调用通知器所持有的切点(Pointcut)对类和方法进行匹配,匹配成功说明应向当前方法织入通知逻辑 - 调用 getInterceptors 方法对非
MethodInterceptor类型的通知进行转换 - 返回拦截器数组,并在随后存入缓存中
这里需要说明一下,部分通知器是没有实现 MethodInterceptor 接口的,比如 AspectJMethodBeforeAdvice。我们可以看一下前置通知适配器是如何将前置通知转为拦截器的,如下:
class MethodBeforeAdviceAdapter implements AdvisorAdapter, Serializable {
    @Override
    public boolean supportsAdvice(Advice advice) {
        return (advice instanceof MethodBeforeAdvice);
    }
    @Override
    public MethodInterceptor getInterceptor(Advisor advisor) {
        MethodBeforeAdvice advice = (MethodBeforeAdvice) advisor.getAdvice();
        // 创建 MethodBeforeAdviceInterceptor 拦截器
        return new MethodBeforeAdviceInterceptor(advice);
    }
}
如上,适配器的逻辑比较简单,这里就不多说了。
现在我们已经获得了拦截器链,那接下来要做的事情就是启动拦截器了。所以接下来,我们一起去看看 Sring 是如何让拦截器链运行起来的。
3.3 启动拦截器链
3.3.1 执行拦截器链
本节的开始,我们先来说说 ReflectiveMethodInvocation。ReflectiveMethodInvocation 贯穿于拦截器链执行的始终,可以说是核心。该类的 proceed 方法用于启动启动拦截器链,下面我们去看看这个方法的逻辑。
public class ReflectiveMethodInvocation implements ProxyMethodInvocation {
    private int currentInterceptorIndex = -1;
    public Object proceed() throws Throwable {
        // 拦截器链中的最后一个拦截器执行完后,即可执行目标方法
        if (this.currentInterceptorIndex == this.interceptorsAndDynamicMethodMatchers.size() - 1) {
            // 执行目标方法
            return invokeJoinpoint();
        }
        Object interceptorOrInterceptionAdvice =
                this.interceptorsAndDynamicMethodMatchers.get(++this.currentInterceptorIndex);
        if (interceptorOrInterceptionAdvice instanceof InterceptorAndDynamicMethodMatcher) {
            InterceptorAndDynamicMethodMatcher dm =
                    (InterceptorAndDynamicMethodMatcher) interceptorOrInterceptionAdvice;
            /*
             * 调用具有三个参数(3-args)的 matches 方法动态匹配目标方法,
             * 两个参数(2-args)的 matches 方法用于静态匹配
             */
            if (dm.methodMatcher.matches(this.method, this.targetClass, this.arguments)) {
                // 调用拦截器逻辑
                return dm.interceptor.invoke(this);
            }
            else {
                // 如果匹配失败,则忽略当前的拦截器
                return proceed();
            }
        }
        else {
            // 调用拦截器逻辑,并传递 ReflectiveMethodInvocation 对象
            return ((MethodInterceptor) interceptorOrInterceptionAdvice).invoke(this);
        }
    }
}
如上,proceed 根据 currentInterceptorIndex 来确定当前应执行哪个拦截器,并在调用拦截器的 invoke 方法时,将自己作为参数传给该方法。前面的章节中,我们看过了前置拦截器的源码,这里来看一下后置拦截器源码。如下:
public class AspectJAfterAdvice extends AbstractAspectJAdvice
        implements MethodInterceptor, AfterAdvice, Serializable {
    public AspectJAfterAdvice(
            Method aspectJBeforeAdviceMethod, AspectJExpressionPointcut pointcut, AspectInstanceFactory aif) {
        super(aspectJBeforeAdviceMethod, pointcut, aif);
    }
    @Override
    public Object invoke(MethodInvocation mi) throws Throwable {
        try {
            // 调用 proceed
            return mi.proceed();
        }
        finally {
            // 调用后置通知逻辑
            invokeAdviceMethod(getJoinPointMatch(), null, null);
        }
    }
    //...
}
如上,由于后置通知需要在目标方法返回后执行,所以 AspectJAfterAdvice 先调用 mi.proceed() 执行下一个拦截器逻辑,等下一个拦截器返回后,再执行后置通知逻辑。如果大家不太理解的话,先看个图。这里假设目标方法 method 在执行前,需要执行两个前置通知和一个后置通知。
下面我们看一下由三个拦截器组成的拦截器链是如何执行的,如下:
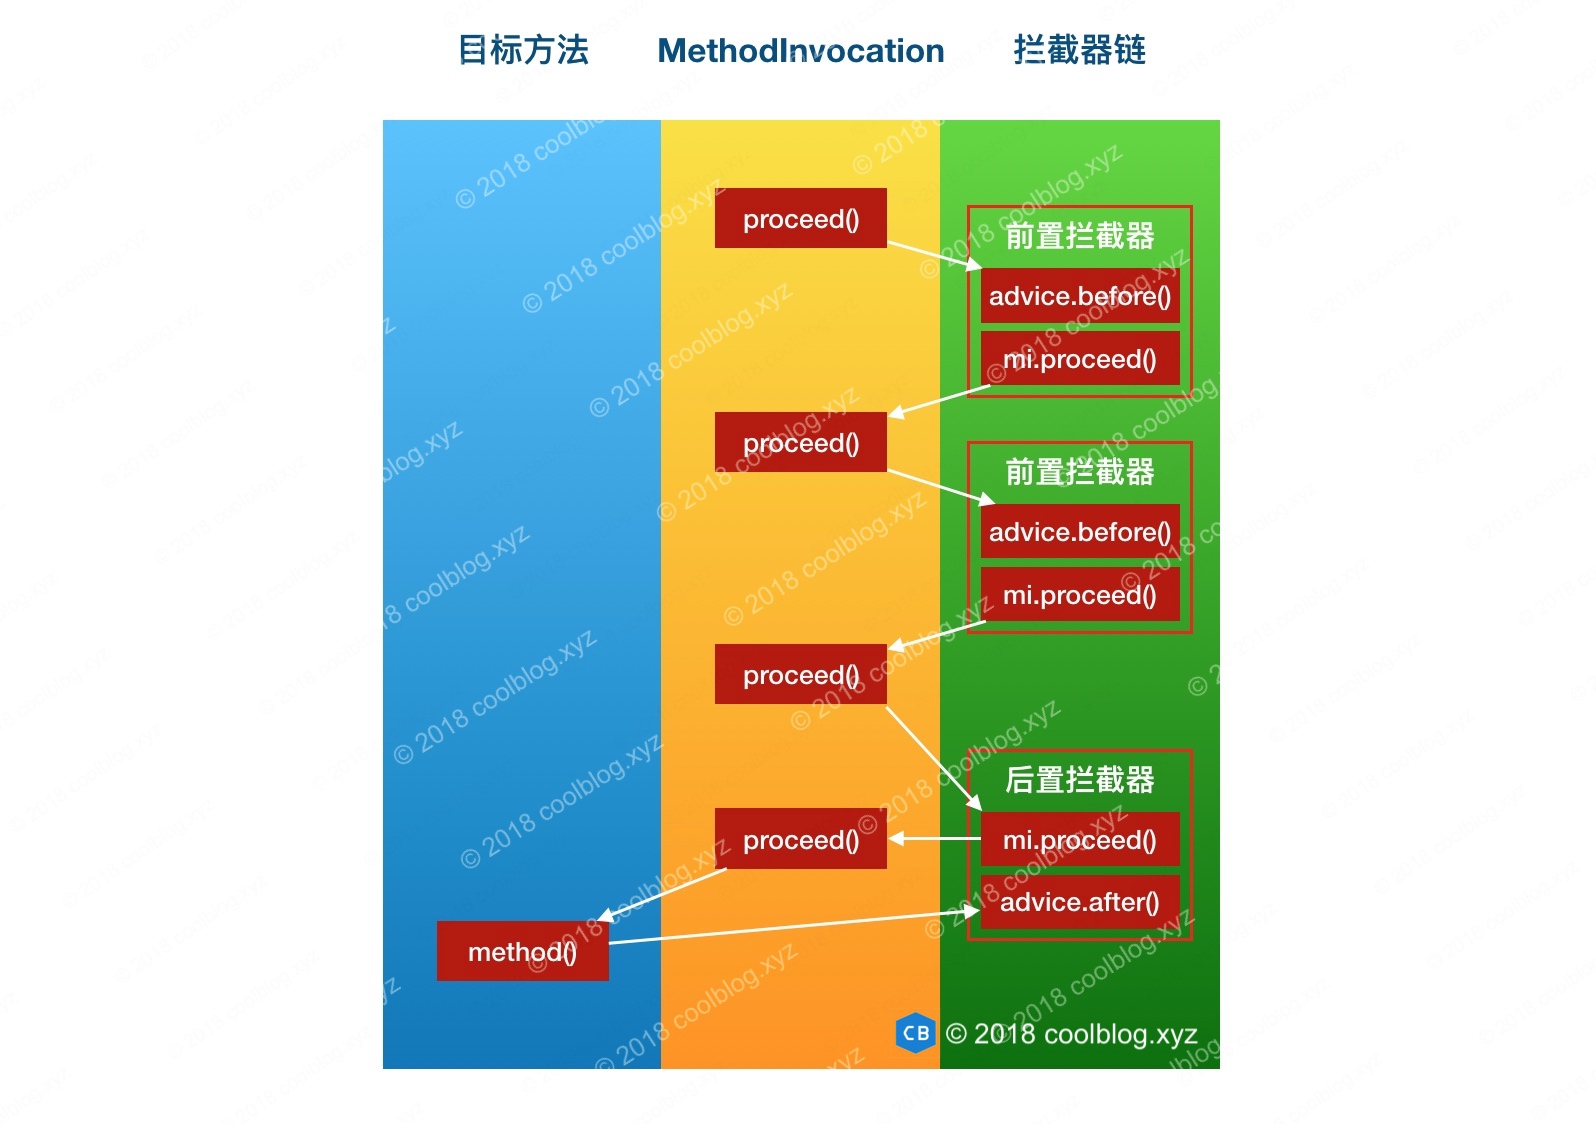

注:这里用
advice.after()表示执行后置通知
本节的最后,插播一个拦截器,即 ExposeInvocationInterceptor。为啥要在这里介绍这个拦截器呢,原因是我在 SpringAOP 源码分析 – 筛选合适的通知器 一文中,在介绍 extendAdvisors 方法时,有一个点没有详细说明。现在大家已经知道拦截器的概念了,就可以把之前没法详细说明的地方进行补充说明。这里再贴一下 extendAdvisors 方法的源码,如下:
protected void extendAdvisors(List<Advisor> candidateAdvisors) {
    AspectJProxyUtils.makeAdvisorChainAspectJCapableIfNecessary(candidateAdvisors);
}
public static boolean makeAdvisorChainAspectJCapableIfNecessary(List<Advisor> advisors) {
    if (!advisors.isEmpty()) {
        // 省略部分代码
        if (foundAspectJAdvice && !advisors.contains(ExposeInvocationInterceptor.ADVISOR)) {
            // 向通知器列表中添加 ExposeInvocationInterceptor.ADVISOR
            advisors.add(0, ExposeInvocationInterceptor.ADVISOR);
            return true;
        }
    }
    return false;
}
如上,extendAdvisors 所调用的方法会向通知器列表首部添加 ExposeInvocationInterceptor.ADVISOR。现在我们再来看看 ExposeInvocationInterceptor 的源码,如下:
public class ExposeInvocationInterceptor implements MethodInterceptor, PriorityOrdered, Serializable {
    public static final ExposeInvocationInterceptor INSTANCE = new ExposeInvocationInterceptor();
    // 创建 DefaultPointcutAdvisor 匿名对象
    public static final Advisor ADVISOR = new DefaultPointcutAdvisor(INSTANCE) {
        @Override
        public String toString() {
            return ExposeInvocationInterceptor.class.getName() +".ADVISOR";
        }
    };
    private static final ThreadLocal<MethodInvocation> invocation =
            new NamedThreadLocal<MethodInvocation>("Current AOP method invocation");
    public static MethodInvocation currentInvocation() throws IllegalStateException {
        MethodInvocation mi = invocation.get();
        if (mi == null)
            throw new IllegalStateException(
                    "No MethodInvocation found: Check that an AOP invocation is in progress, and that the " +
                    "ExposeInvocationInterceptor is upfront in the interceptor chain. Specifically, note that " +
                    "advices with order HIGHEST_PRECEDENCE will execute before ExposeInvocationInterceptor!");
        return mi;
    }
    // 私有构造方法
    private ExposeInvocationInterceptor() {
    }
    @Override
    public Object invoke(MethodInvocation mi) throws Throwable {
        MethodInvocation oldInvocation = invocation.get();
        // 将 mi 设置到 ThreadLocal 中
        invocation.set(mi);
        try {
            // 调用下一个拦截器
            return mi.proceed();
        }
        finally {
            invocation.set(oldInvocation);
        }
    }
    //...
}
如上,ExposeInvocationInterceptor.ADVISOR 经过 registry.getInterceptors 方法(前面已分析过)处理后,即可得到 ExposeInvocationInterceptor。ExposeInvocationInterceptor 的作用是用于暴露 MethodInvocation 对象到 ThreadLocal 中,其名字也体现出了这一点。
如果其他地方需要当前的 MethodInvocation 对象,直接通过调用 currentInvocation 方法取出。至于哪些地方需要 MethodInvocation,这个大家自己去探索吧。最后,建议大家写点代码调试一下。
我在一开始阅读代码时,并没有注意到 ExposeInvocationInterceptor,而是在调试代码的过程中才发现的。
比如:

好了,关于拦截器链的执行过程这里就讲完了。下一节,我们来看一下目标方法的执行过程。大家再忍忍,源码很快分析完了。
3.3.2 执行目标方法
与前面的大部头相比,本节的源码比较短,也很简单。本节我们来看一下目标方法的执行过程,如下:
protected Object invokeJoinpoint() throws Throwable {
    return AopUtils.invokeJoinpointUsingReflection(this.target, this.method, this.arguments);
}
public abstract class AopUtils {
    public static Object invokeJoinpointUsingReflection(Object target, Method method, Object[] args)
            throws Throwable {
        try {
            ReflectionUtils.makeAccessible(method);
            // 通过反射执行目标方法
            return method.invoke(target, args);
        }
        catch (InvocationTargetException ex) {...}
        catch (IllegalArgumentException ex) {...}
        catch (IllegalAccessException ex) {...}
    }
}
目标方法时通过反射执行的,比较简单的吧。好了,就不多说了,over。
4.总结
到此,本篇文章的就要结束了。本篇文章是 Spring AOP 源码分析系列文章的最后一篇,从阅读源码到写完本系列的4篇文章总共花了约两周的时间。
总的来说还是有点累的,但是也有很大的收获和成就感,值了。需要说明的是,Spring IOC 和 AOP 部分的源码我分析的并不是非常详细,也有很多地方没弄懂。
这一系列的文章,是作为自己工作两年的一个总结。由于工作时间不长,工作经验和技术水平目前都还处于入门阶段。
所以暂时很难把 Spring IOC 和 AOP 模块的源码分析的很出彩,这个请见谅。如果大家在阅读文章的过程中发现了错误,可以指出来,也希望多多指教,这里先说说谢谢。
好了,本篇文章到这里就结束了。谢谢大家的阅读。
参考
《[Spring 源码深度解析](https://book.douban.com/subject/25866350/ "Spring 源码深度解析")》- 郝佳
希望读者能够给小编留言,也可以点击[此处扫下面二维码关注微信公众号](https://www.ycbbs.vip/?p=28 "此处扫下面二维码关注微信公众号")
看完两件小事
如果你觉得这篇文章对你挺有启发,我想请你帮我两个小忙:
- 把这篇文章分享给你的朋友 / 交流群,让更多的人看到,一起进步,一起成长!
- 关注公众号 「方志朋」,公众号后台回复「666」 免费领取我精心整理的进阶资源教程

本文著作权归作者所有,如若转载,请注明出处
转载请注明:文章转载自「 Java极客技术学习 」https://www.javajike.com
 微信扫一扫
微信扫一扫