
17-一起来学 SpringBoot 2.x 第十七篇:轻松搞定文件上传
作者:唐亚峰 | 出自:https://blog.battcn.com
SpringBoot 是为了简化 Spring 应用的创建、运行、调试、部署等一系列问题而诞生的产物,自动装配的特性让我们可以更好的关注业务本身而不是外部的XML配置,我们只需遵循规范,引入相关的依赖就可以轻易的搭建出一个 WEB 工程
文件上传和下载是JAVA WEB中常见的一种操作,文件上传主要是将文件通过IO流传输到服务器的某一个特定的文件夹下;刚开始工作那会一个上传文件常常花费小半天的时间,繁琐的代码量以及XML配置让我是痛不欲生;值得庆幸的是有了Spring Boot短短的几句代码就能实现文件上传与本地写入操作….
文件上传
文件上传和下载是JAVA WEB中常见的一种操作,文件上传主要是将文件通过IO流传输到服务器的某一个特定的文件夹下;刚开始工作那会一个上传文件常常花费小半天的时间,繁琐的代码量以及XML配置让我是痛不欲生;值得庆幸的是有了Spring Boot短短的几句代码就能实现文件上传与本地写入操作….
导入依赖
在 pom.xml 中添加上 spring-boot-starter-web 和 spring-boot-starter-thymeleaf 的依赖
<dependencies>
    <dependency>
        <groupId>org.springframework.boot</groupId>
        <artifactId>spring-boot-starter-web</artifactId>
    </dependency>
    <dependency>
        <groupId>org.springframework.boot</groupId>
        <artifactId>spring-boot-starter-thymeleaf</artifactId>
    </dependency>
    <dependency>
        <groupId>org.springframework.boot</groupId>
        <artifactId>spring-boot-starter-test</artifactId>
        <scope>test</scope>
    </dependency>
</dependencies>
配置文件
默认情况下 Spring Boot 无需做任何配置也能实现文件上传的功能,但有可能因默认配置不符而导致文件上传失败问题,所以了解相关配置信息更有助于我们对问题的定位和修复;
# 禁用 thymeleaf 缓存
spring.thymeleaf.cache=false
# 是否支持批量上传   (默认值 true)
spring.servlet.multipart.enabled=true
# 上传文件的临时目录 (一般情况下不用特意修改)
spring.servlet.multipart.location=
# 上传文件最大为 1M (默认值 1M 根据自身业务自行控制即可)
spring.servlet.multipart.max-file-size=1048576
# 上传请求最大为 10M(默认值10M 根据自身业务自行控制即可)
spring.servlet.multipart.max-request-size=10485760
# 文件大小阈值,当大于这个阈值时将写入到磁盘,否则存在内存中,(默认值0 一般情况下不用特意修改)
spring.servlet.multipart.file-size-threshold=0
# 判断是否要延迟解析文件(相当于懒加载,一般情况下不用特意修改)
spring.servlet.multipart.resolve-lazily=false
如默认只允许1M以下的文件,当超出该范围则会抛出下述错误
org.apache.tomcat.util.http.fileupload.FileUploadBase$SizeLimitExceededException:
the request was rejected because its size (20738021) exceeds the configured maximum (10485760)
具体代码
上传页面
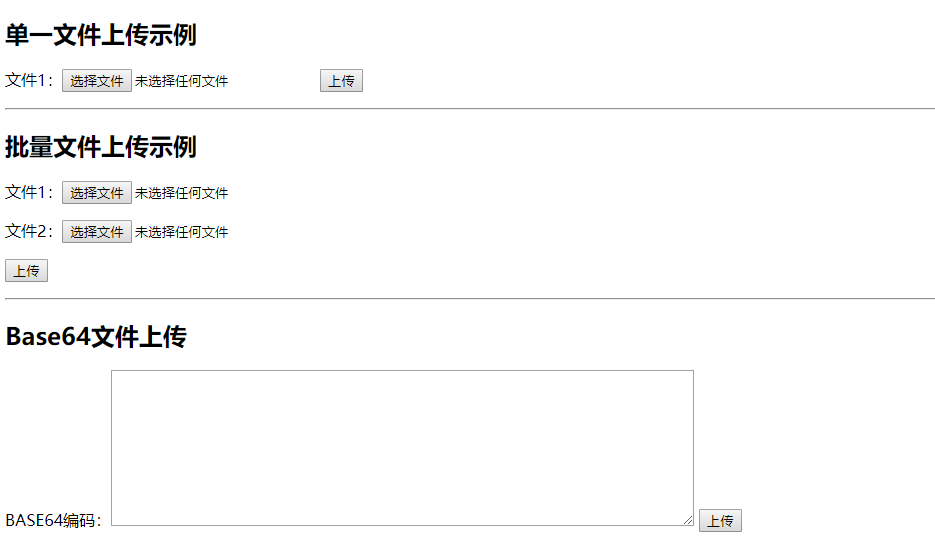
在 src/main/resources 目录下新建 static 目录和 templates 目录。在 templates 中新建一个 index.html 的模板文件;此处实现 单文件上传、多文件上传、BASE64编码 三种上传方式,其中 BASE64 的方式在对Android/IOS/H5等方面还是不错的…
<!DOCTYPE html>
<html xmlns="http://www.w3.org/1999/xhtml"
      xmlns:th="http://www.thymeleaf.org">
<head>
    <meta charset="UTF-8">
    <title>文件上传</title>
</head>
<body>
<h2>单一文件上传示例</h2>
<div>
    <form method="POST" enctype="multipart/form-data" action="/uploads/upload1">
        <p>
            文件1:<input type="file" name="file"/>
            <input type="submit" value="上传"/>
        </p>
    </form>
</div>
<hr/>
<h2>批量文件上传示例</h2>
<div>
    <form method="POST" enctype="multipart/form-data"
          action="/uploads/upload2">
        <p>
            文件1:<input type="file" name="file"/>
        </p>
        <p>
            文件2:<input type="file" name="file"/>
        </p>
        <p>
            <input type="submit" value="上传"/>
        </p>
    </form>
</div>
<hr/>
<h2>Base64文件上传</h2>
<div>
    <form method="POST" action="/uploads/upload3">
        <p>
            BASE64编码:<textarea name="base64" rows="10" cols="80"></textarea>
            <input type="submit" value="上传"/>
        </p>
    </form>
</div>
</body>
</html>
控制层
创建一个FileUploadController,其中@GetMapping的方法用来跳转index.html页面,而@PostMapping相关方法则是对应的 单文件上传、多文件上传、BASE64编码 三种处理方式。
@RequestParam("file") 此处的"file"对应的就是html 中 name="file" 的 input 标签,而将文件真正写入的还是借助的commons-io中的FileUtils.copyInputStreamToFile(inputStream,file)
package com.battcn.controller;
import org.slf4j.Logger;
import org.slf4j.LoggerFactory;
import org.springframework.stereotype.Controller;
import org.springframework.util.Base64Utils;
import org.springframework.util.FileCopyUtils;
import org.springframework.web.bind.annotation.*;
import org.springframework.web.multipart.MultipartFile;
import java.io.File;
import java.io.IOException;
import java.util.ArrayList;
import java.util.HashMap;
import java.util.List;
import java.util.Map;
/**
 * 图片上传的几种方式
 *
 * @author Levin
 * @since 2018/5/31 0031
 */
@Controller
@RequestMapping("/uploads")
public class FileUploadController {
    private static final Logger log = LoggerFactory.getLogger(FileUploadController.class);
    @GetMapping
    public String index() {
        return "index";
    }
    @PostMapping("/upload1")
    @ResponseBody
    public Map<String, String> upload1(@RequestParam("file") MultipartFile file) throws IOException {
        log.info("[文件类型] - [{}]", file.getContentType());
        log.info("[文件名称] - [{}]", file.getOriginalFilename());
        log.info("[文件大小] - [{}]", file.getSize());
        // TODO 将文件写入到指定目录(具体开发中有可能是将文件写入到云存储/或者指定目录通过 Nginx 进行 gzip 压缩和反向代理,此处只是为了演示故将地址写成本地电脑指定目录)
        file.transferTo(new File("F:\\app\\chapter16\\" + file.getOriginalFilename()));
        Map<String, String> result = new HashMap<>(16);
        result.put("contentType", file.getContentType());
        result.put("fileName", file.getOriginalFilename());
        result.put("fileSize", file.getSize() + "");
        return result;
    }
    @PostMapping("/upload2")
    @ResponseBody
    public List<Map<String, String>> upload2(@RequestParam("file") MultipartFile[] files) throws IOException {
        if (files == null || files.length == 0) {
            return null;
        }
        List<Map<String, String>> results = new ArrayList<>();
        for (MultipartFile file : files) {
            // TODO Spring Mvc 提供的写入方式
            file.transferTo(new File("F:\\app\\chapter16\\" + file.getOriginalFilename()));
            Map<String, String> map = new HashMap<>(16);
            map.put("contentType", file.getContentType());
            map.put("fileName", file.getOriginalFilename());
            map.put("fileSize", file.getSize() + "");
            results.add(map);
        }
        return results;
    }
    @PostMapping("/upload3")
    @ResponseBody
    public void upload2(String base64) throws IOException {
        // TODO BASE64 方式的 格式和名字需要自己控制(如 png 图片编码后前缀就会是 data:image/png;base64,)
        final File tempFile = new File("F:\\app\\chapter16\\test.jpg");
        // TODO 防止有的传了 data:image/png;base64, 有的没传的情况
        String[] d = base64.split("base64,");
        final byte[] bytes = Base64Utils.decodeFromString(d.length > 1 ? d[1] : d[0]);
        FileCopyUtils.copy(bytes, tempFile);
    }
}
主函数
package com.battcn;
import org.springframework.boot.SpringApplication;
import org.springframework.boot.autoconfigure.SpringBootApplication;
/**
 * @author Levin
 */
@SpringBootApplication
public class Chapter16Application {
    public static void main(String[] args) {
        SpringApplication.run(Chapter16Application.class, args);
    }
}
测试
完成准备事项后,启动Chapter16Application,访问 http://localhost:8080/uploads 进入到文件上传页面。单文件上传、多文件上传都是及其简单的就不做演示了,相信各位自己也是可以完成的。

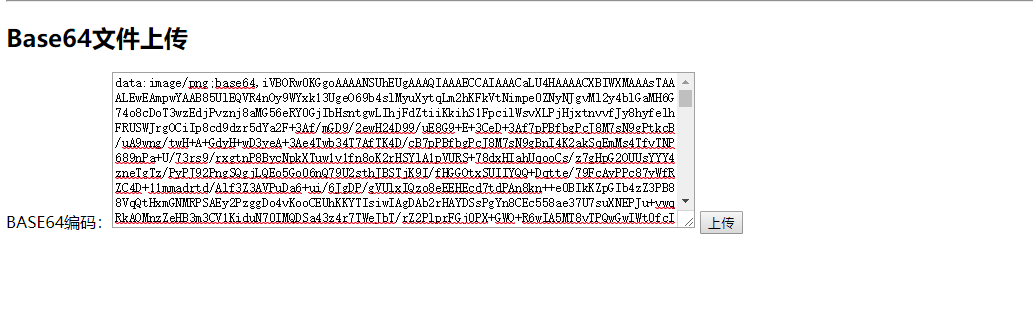
BASE64 测试方法
打开浏览器访问 http://base64.xpcha.com/pic.html 选择一张图片将其转换为base64编码的,随后将转换后的base64字符串内容 复制到下图中的文本框中,点击上传即可,随后到指定目录下就可以看到我们上传的文件了
总结
目前很多大佬都写过关于 SpringBoot 的教程了,如有雷同,请多多包涵,本教程基于最新的 spring-boot-starter-parent:2.0.2.RELEASE编写,包括新版本的特性都会一起介绍…
说点什么
全文代码:[https://github.com/battcn/spring-boot2-learning/tree/master/chapter16](https://github.com/battcn/spring-boot2-learning/tree/master/chapter16 "https://github.com/battcn/spring-boot2-learning/tree/master/chapter16")
希望读者能够给小编留言,也可以点击[此处扫下面二维码关注微信公众号](https://www.ycbbs.vip/?p=28 "此处扫下面二维码关注微信公众号")
看完两件小事
如果你觉得这篇文章对你挺有启发,我想请你帮我两个小忙:
- 把这篇文章分享给你的朋友 / 交流群,让更多的人看到,一起进步,一起成长!
- 关注公众号 「方志朋」,公众号后台回复「666」 免费领取我精心整理的进阶资源教程

本文著作权归作者所有,如若转载,请注明出处
转载请注明:文章转载自「 Java极客技术学习 」https://www.javajike.com
 微信扫一扫
微信扫一扫