
一起来学 SpringBoot 2.x | 第二十三篇轻松搞定重复提交(分布式锁)
作者:唐亚峰 出自: https://blog.battcn.com/
在 一起来学SpringBoot | 第二十二篇:轻松搞定重复提交(一) 一文中介绍了 单机版的重复提交解决方案,在如今这个分布式与集群横行的世道中,那怎么够用呢,所以本章重点来了....
重复提交(分布式)
单机版中我们用的是 Guava Cache,但是这玩意存在集群的时候就凉了, 所以我们还是要借助类似Redis、ZooKeeper 之类的中间件实现分布式锁。
本章目标
利用 自定义注解、 Spring Aop、 Redis Cache 实现分布式锁,你想锁表单锁表单,想锁接口锁接口….
具体代码
也很简单…
导入依赖
在 pom.xml 中添加上 starter-web、 starter-aop、 starter-data-redis 的依赖即可
  <dependencies>
     <dependency>
     <groupId>org.springframework.boot</groupId>
     <artifactId>spring-boot-starter-web</artifactId>
     </dependency>
     <dependency>
     <groupId>org.springframework.boot</groupId>
     <artifactId>spring-boot-starter-aop</artifactId>
     </dependency>
     <dependency>
     <groupId>org.springframework.boot</groupId>
     <artifactId>spring-boot-starter-data-redis</artifactId>
     </dependency>
    </dependencies>
属性配置
在 application.properites 资源文件中添加 redis 相关的配置项
  spring.redis.host=localhost
    spring.redis.port=6379
    spring.redis.password=battcn
CacheLock 注解
创建一个 CacheLock 注解,本章内容都是实战使用过的,所以属性配置会相对完善了,话不多说注释都给各位写齐全了….
prefix:缓存中 key 的前缀expire:过期时间,此处默认为 5 秒timeUnit:超时单位,此处默认为秒delimiter:key 的分隔符,将不同参数值分割开来
  package com.battcn.annotation;

    import java.lang.annotation.*;
    import java.util.concurrent.TimeUnit;

    /**
     * @author Levin
     */
    @Target(ElementType.METHOD)
    @Retention(RetentionPolicy.RUNTIME)
    @Documented
    @Inherited
    public @interface CacheLock {

        /**
         * redis 锁key的前缀
         *
         * @return redis 锁key的前缀
         */
        String prefix() default "";

        /**
         * 过期秒数,默认为5秒
         *
         * @return 轮询锁的时间
         */
        int expire() default 5;

        /**
         * 超时时间单位
         *
         * @return 秒
         */
        TimeUnit timeUnit() default TimeUnit.SECONDS;

        /**
         * <p>Key的分隔符(默认 :)</p>
         * <p>生成的Key:N:SO1008:500</p>
         *
         * @return String
         */
        String delimiter() default ":";
    }
CacheParam 注解
上一篇中给说过 key 的生成规则是自己定义的,如果通过表达式语法自己得去写解析规则还是比较麻烦的,所以依旧是用注解的方式…
  package com.battcn.annotation;

    import java.lang.annotation.*;

    /**
     * 锁的参数
     *
     * @author Levin
     */
    @Target({ElementType.PARAMETER, ElementType.METHOD, ElementType.FIELD})
    @Retention(RetentionPolicy.RUNTIME)
    @Documented
    @Inherited
    public @interface CacheParam {

        /**
         * 字段名称
         *
         * @return String
         */
        String name() default "";
    }
Key 生成策略(接口)
创建一个 CacheKeyGenerator 具体实现由使用者自己去注入
  /**
     * key生成器
     *
     * @author Levin
     * @date 2018/03/22
     */
    public interface CacheKeyGenerator {

        /**
         * 获取AOP参数,生成指定缓存Key
         *
         * @param pjp PJP
         * @return 缓存KEY
         */
        String getLockKey(ProceedingJoinPoint pjp);
    }
Key 生成策略(实现)
解析过程虽然看上去优点绕,但认真阅读或者调试就会发现,主要是解析带 CacheLock 注解的属性,获取对应的属性值,生成一个全新的缓存 Key
  package com.battcn.interceptor;

    import com.battcn.annotation.CacheLock;
    import com.battcn.annotation.CacheParam;
    import org.aspectj.lang.ProceedingJoinPoint;
    import org.aspectj.lang.reflect.MethodSignature;
    import org.springframework.util.ReflectionUtils;
    import org.springframework.util.StringUtils;

    import java.lang.annotation.Annotation;
    import java.lang.reflect.Field;
    import java.lang.reflect.Method;
    import java.lang.reflect.Parameter;

    /**
     * 上一章说过通过接口注入的方式去写不同的生成规则;
     * @author Levin
     * @since 2018/6/13 0026
     */
    public class LockKeyGenerator implements CacheKeyGenerator {

        @Override
        public String getLockKey(ProceedingJoinPoint pjp) {
            MethodSignature signature = (MethodSignature) pjp.getSignature();
            Method method = signature.getMethod();
            CacheLock lockAnnotation = method.getAnnotation(CacheLock.class);
            final Object[] args = pjp.getArgs();
            final Parameter[] parameters = method.getParameters();
            StringBuilder builder = new StringBuilder();
            // TODO 默认解析方法里面带 CacheParam 注解的属性,如果没有尝试着解析实体对象中的
            for (int i = 0; i < parameters.length; i++) {
                final CacheParam annotation = parameters[i].getAnnotation(CacheParam.class);
                if (annotation == null) {
                    continue;
                }
                builder.append(lockAnnotation.delimiter()).append(args[i]);
            }
            if (StringUtils.isEmpty(builder.toString())) {
                final Annotation[][] parameterAnnotations = method.getParameterAnnotations();
                for (int i = 0; i < parameterAnnotations.length; i++) {
                    final Object object = args[i];
                    final Field[] fields = object.getClass().getDeclaredFields();
                    for (Field field : fields) {
                        final CacheParam annotation = field.getAnnotation(CacheParam.class);
                        if (annotation == null) {
                            continue;
                        }
                        field.setAccessible(true);
                        builder.append(lockAnnotation.delimiter()).append(ReflectionUtils.getField(field, object));
                    }
                }
            }
            return lockAnnotation.prefix() + builder.toString();
        }
    }
Lock 拦截器(AOP)
熟悉 Redis 的朋友都知道它是线程安全的,我们利用它的特性可以很轻松的实现一个分布式锁,如 opsForValue().setIfAbsent(key,value)它的作用就是如果缓存中没有当前 Key 则进行缓存同时返回 true 反之亦然; 当缓存后给 key 在设置个过期时间,防止因为系统崩溃而导致锁迟迟不释放形成死锁; 那么我们是不是可以这样认为当返回 true 我们认为它获取到锁了,在锁未释放的时候我们进行异常的抛出….
  package com.battcn.interceptor;

    import com.battcn.annotation.CacheLock;
    import com.battcn.utils.RedisLockHelper;
    import org.aspectj.lang.ProceedingJoinPoint;
    import org.aspectj.lang.annotation.Around;
    import org.aspectj.lang.annotation.Aspect;
    import org.aspectj.lang.reflect.MethodSignature;
    import org.springframework.beans.factory.annotation.Autowired;
    import org.springframework.context.annotation.Configuration;
    import org.springframework.util.StringUtils;

    import java.lang.reflect.Method;
    import java.util.UUID;

    /**
     * redis 方案
     *
     * @author Levin
     * @since 2018/6/12 0012
     */
    @Aspect
    @Configuration
    public class LockMethodInterceptor {

        @Autowired
        public LockMethodInterceptor(RedisLockHelper redisLockHelper, CacheKeyGenerator cacheKeyGenerator) {
            this.redisLockHelper = redisLockHelper;
            this.cacheKeyGenerator = cacheKeyGenerator;
        }

        private final RedisLockHelper redisLockHelper;
        private final CacheKeyGenerator cacheKeyGenerator;


        @Around("execution(public * *(..)) && @annotation(com.battcn.annotation.CacheLock)")
        public Object interceptor(ProceedingJoinPoint pjp) {
            MethodSignature signature = (MethodSignature) pjp.getSignature();
            Method method = signature.getMethod();
            CacheLock lock = method.getAnnotation(CacheLock.class);
            if (StringUtils.isEmpty(lock.prefix())) {
                throw new RuntimeException("lock key don't null...");
            }
            final String lockKey = cacheKeyGenerator.getLockKey(pjp);
            String value = UUID.randomUUID().toString();
            try {
                // 假设上锁成功,但是设置过期时间失效,以后拿到的都是 false
                final boolean success = redisLockHelper.lock(lockKey, value, lock.expire(), lock.timeUnit());
                if (!success) {
                    throw new RuntimeException("重复提交");
                }
                try {
                    return pjp.proceed();
                } catch (Throwable throwable) {
                    throw new RuntimeException("系统异常");
                }
            } finally {
                // TODO 如果演示的话需要注释该代码;实际应该放开
                redisLockHelper.unlock(lockKey, value);
            }
        }
    }
RedisLockHelper
通过封装成 API 方式调用,灵活度更加高
  package com.battcn.utils;

    import org.springframework.boot.autoconfigure.AutoConfigureAfter;
    import org.springframework.boot.autoconfigure.data.redis.RedisAutoConfiguration;
    import org.springframework.context.annotation.Configuration;
    import org.springframework.data.redis.connection.RedisStringCommands;
    import org.springframework.data.redis.core.RedisCallback;
    import org.springframework.data.redis.core.StringRedisTemplate;
    import org.springframework.data.redis.core.types.Expiration;
    import org.springframework.util.StringUtils;

    import java.util.concurrent.Executors;
    import java.util.concurrent.ScheduledExecutorService;
    import java.util.concurrent.TimeUnit;
    import java.util.regex.Pattern;

    /**
     * 需要定义成 Bean
     *
     * @author Levin
     * @since 2018/6/15 0015
     */
    @Configuration
    @AutoConfigureAfter(RedisAutoConfiguration.class)
    public class RedisLockHelper {


        private static final String DELIMITER = "|";

        /**
         * 如果要求比较高可以通过注入的方式分配
         */
        private static final ScheduledExecutorService EXECUTOR_SERVICE = Executors.newScheduledThreadPool(10);

        private final StringRedisTemplate stringRedisTemplate;

        public RedisLockHelper(StringRedisTemplate stringRedisTemplate) {
            this.stringRedisTemplate = stringRedisTemplate;
        }

        /**
         * 获取锁(存在死锁风险)
         *
         * @param lockKey lockKey
         * @param value   value
         * @param time    超时时间
         * @param unit    过期单位
         * @return true or false
         */
        public boolean tryLock(final String lockKey, final String value, final long time, final TimeUnit unit) {
            return stringRedisTemplate.execute((RedisCallback<Boolean>) connection -> connection.set(lockKey.getBytes(), value.getBytes(), Expiration.from(time, unit), RedisStringCommands.SetOption.SET_IF_ABSENT));
        }

        /**
         * 获取锁
         *
         * @param lockKey lockKey
         * @param uuid    UUID
         * @param timeout 超时时间
         * @param unit    过期单位
         * @return true or false
         */
        public boolean lock(String lockKey, final String uuid, long timeout, final TimeUnit unit) {
            final long milliseconds = Expiration.from(timeout, unit).getExpirationTimeInMilliseconds();
            boolean success = stringRedisTemplate.opsForValue().setIfAbsent(lockKey, (System.currentTimeMillis() + milliseconds) + DELIMITER + uuid);
            if (success) {
                stringRedisTemplate.expire(lockKey, timeout, TimeUnit.SECONDS);
            } else {
                String oldVal = stringRedisTemplate.opsForValue().getAndSet(lockKey, (System.currentTimeMillis() + milliseconds) + DELIMITER + uuid);
                final String[] oldValues = oldVal.split(Pattern.quote(DELIMITER));
                if (Long.parseLong(oldValues[0]) + 1 <= System.currentTimeMillis()) {
                    return true;
                }
            }
            return success;
        }


        /**
         * @see <a href="http://redis.io/commands/set">Redis Documentation: SET</a>
         */
        public void unlock(String lockKey, String value) {
            unlock(lockKey, value, 0, TimeUnit.MILLISECONDS);
        }

        /**
         * 延迟unlock
         *
         * @param lockKey   key
         * @param uuid      client(最好是唯一键的)
         * @param delayTime 延迟时间
         * @param unit      时间单位
         */
        public void unlock(final String lockKey, final String uuid, long delayTime, TimeUnit unit) {
            if (StringUtils.isEmpty(lockKey)) {
                return;
            }
            if (delayTime <= 0) {
                doUnlock(lockKey, uuid);
            } else {
                EXECUTOR_SERVICE.schedule(() -> doUnlock(lockKey, uuid), delayTime, unit);
            }
        }

        /**
         * @param lockKey key
         * @param uuid    client(最好是唯一键的)
         */
        private void doUnlock(final String lockKey, final String uuid) {
            String val = stringRedisTemplate.opsForValue().get(lockKey);
            final String[] values = val.split(Pattern.quote(DELIMITER));
            if (values.length <= 0) {
                return;
            }
            if (uuid.equals(values[1])) {
                stringRedisTemplate.delete(lockKey);
            }
        }

    }
控制层
在接口上添加 @CacheLock(prefix = "books"),然后动态的值可以加上 @CacheParam;生成后的新 key 将被缓存起来;( 如:该接口 token = 1,那么最终的 key 值为 books:1,如果多个条件则依次类推)
  package com.battcn.controller;

    import com.battcn.annotation.CacheLock;
    import com.battcn.annotation.CacheParam;
    import org.springframework.web.bind.annotation.GetMapping;
    import org.springframework.web.bind.annotation.RequestMapping;
    import org.springframework.web.bind.annotation.RequestParam;
    import org.springframework.web.bind.annotation.RestController;

    /**
     * BookController
     *
     * @author Levin
     * @since 2018/6/06 0031
     */
    @RestController
    @RequestMapping("/books")
    public class BookController {

        @CacheLock(prefix = "books")
        @GetMapping
        public String query(@CacheParam(name = "token") @RequestParam String token) {
            return "success - " + token;
        }

    }
主函数
这里需要注入前面定义好的 CacheKeyGenerator 接口具体实现…
  package com.battcn;

    import com.battcn.interceptor.CacheKeyGenerator;
    import com.battcn.interceptor.LockKeyGenerator;
    import org.springframework.boot.SpringApplication;
    import org.springframework.boot.autoconfigure.SpringBootApplication;
    import org.springframework.context.annotation.Bean;


    /**
     * @author Levin
     */
    @SpringBootApplication
    public class Chapter22Application {

        public static void main(String[] args) {

            SpringApplication.run(Chapter22Application.class, args);

        }

        @Bean
        public CacheKeyGenerator cacheKeyGenerator() {
            return new LockKeyGenerator();
        }

    }
测试
完成准备事项后,启动 Chapter22Application 自行测试即可,测试手段相信大伙都不陌生了,如 浏览器、 postman、 junit、 swagger,此处基于 postman,如果你觉得自带的异常信息不够友好,那么配上 一起来学SpringBoot | 第十八篇:轻松搞定全局异常 可以轻松搞定…
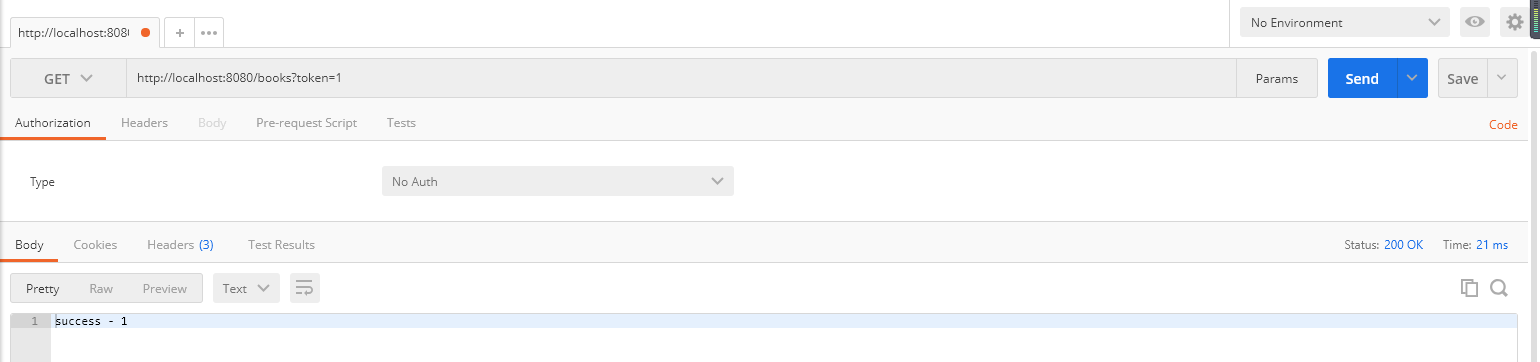
第一次请求

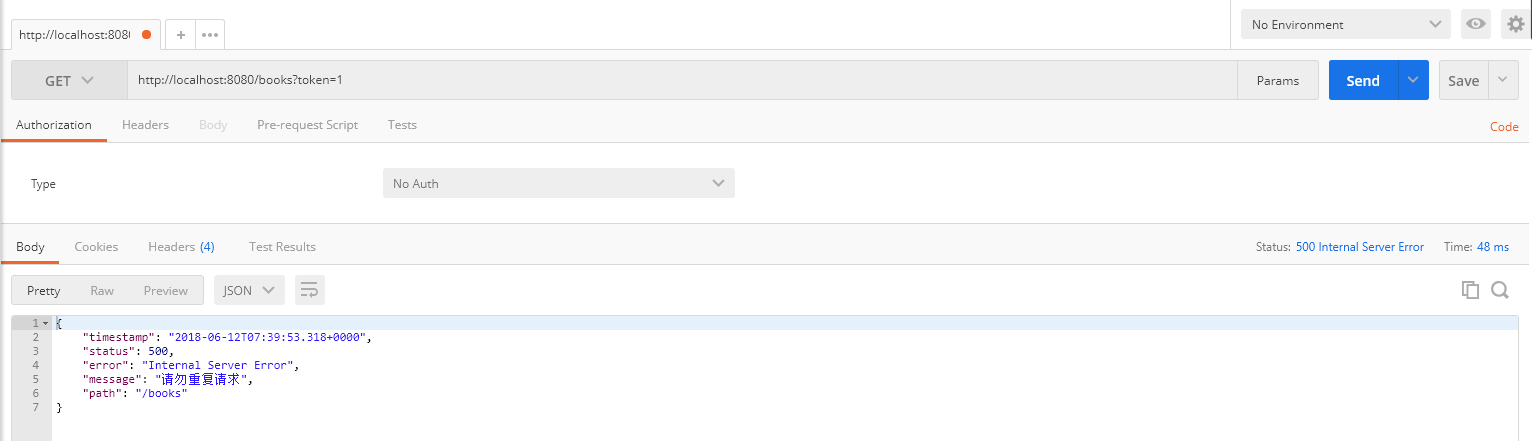
第二次请求
总结
目前很多大佬都写过关于 SpringBoot 的教程了,如有雷同,请多多包涵,本教程基于最新的 spring-boot-starter-parent:2.0.2.RELEASE编写,包括新版本的特性都会一起介绍…
看完两件小事
如果你觉得这篇文章对你挺有启发,我想请你帮我两个小忙:
- 把这篇文章分享给你的朋友 / 交流群,让更多的人看到,一起进步,一起成长!
- 关注公众号 「方志朋」,公众号后台回复「666」 免费领取我精心整理的进阶资源教程

本文著作权归作者所有,如若转载,请注明出处
转载请注明:文章转载自「 Java极客技术学习 」https://www.javajike.com
 微信扫一扫
微信扫一扫