
MyBatis学习总结(八)——Mybatis3.x与Spring4.x整合
一、搭建开发环境
1.1、使用Maven创建Web项目
执行如下命令:
mvn archetype:create -DgroupId=me.gacl -DartifactId=spring4-mybatis3 -DarchetypeArtifactId=maven-archetype-webapp -DinteractiveMode=false
如下图所示:
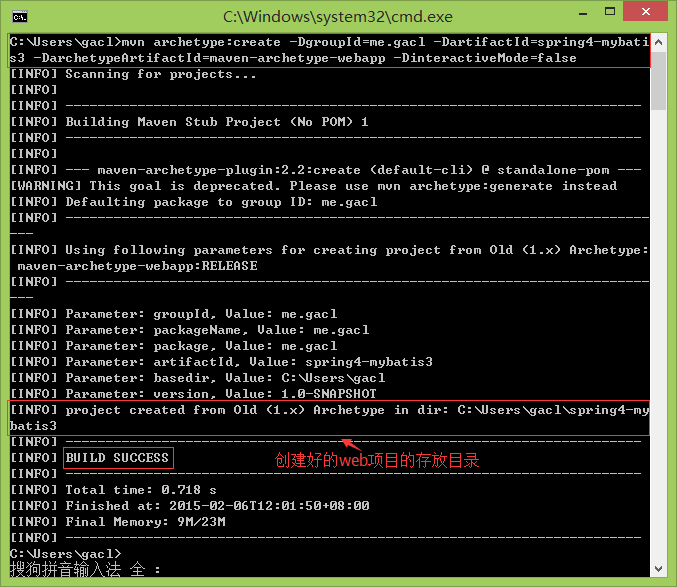

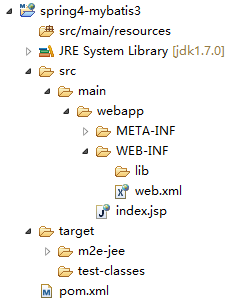
创建好的项目如下:

编辑pom.xml文件
 <project xmlns="http://maven.apache.org/POM/4.0.0" xmlns:xsi="http://www.w3.org/2001/XMLSchema-instance"
   xsi:schemaLocation="http://maven.apache.org/POM/4.0.0 http://maven.apache.org/maven-v4_0_0.xsd">
   <modelVersion>4.0.0</modelVersion>
   <groupId>me.gacl</groupId>
   <artifactId>spring4-mybatis3</artifactId>
   <packaging>war</packaging>
   <version>1.0-SNAPSHOT</version>
   <name>spring4-mybatis3 Maven Webapp</name>
   <url>http://maven.apache.org</url>
   <dependencies>
     <dependency>
       <groupId>junit</groupId>
       <artifactId>junit</artifactId>
       <version>3.8.1</version>
       <scope>test</scope>
     </dependency>
   </dependencies>
   <build>
     <finalName>spring4-mybatis3</finalName>
   </build>
 </project>
修改 <name>spring4-mybatis3 Maven Webapp</name> 部分,把" Maven Webapp"这部分包含空格的内容去掉,否则Maven在编译项目时会因为空格的原因导致一些莫名其妙的错误出现,修改成: <name>spring4-mybatis3</name> 。
另外,把以下内容删掉:
 <dependency>
       <groupId>junit</groupId>
       <artifactId>junit</artifactId>
       <version>3.8.1</version>
       <scope>test</scope>
 </dependency>
这部分是junit的jar包依赖信息,这个版本太低了,我们不使用这个Junit测试版本,修改过后的pom.xml内容如下:
 <project xmlns="http://maven.apache.org/POM/4.0.0" xmlns:xsi="http://www.w3.org/2001/XMLSchema-instance"
   xsi:schemaLocation="http://maven.apache.org/POM/4.0.0 http://maven.apache.org/maven-v4_0_0.xsd">
   <modelVersion>4.0.0</modelVersion>
   <groupId>me.gacl</groupId>
   <artifactId>spring4-mybatis3</artifactId>
   <packaging>war</packaging>
   <version>1.0-SNAPSHOT</version>
   <name>spring4-mybatis3</name>
   <url>http://maven.apache.org</url>
   <dependencies>

   </dependencies>
   <build>
     <finalName>spring4-mybatis3</finalName>
   </build>
 </project>
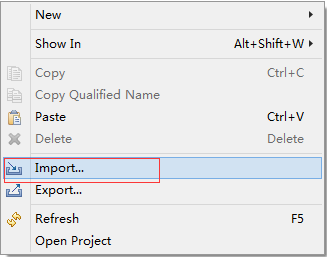
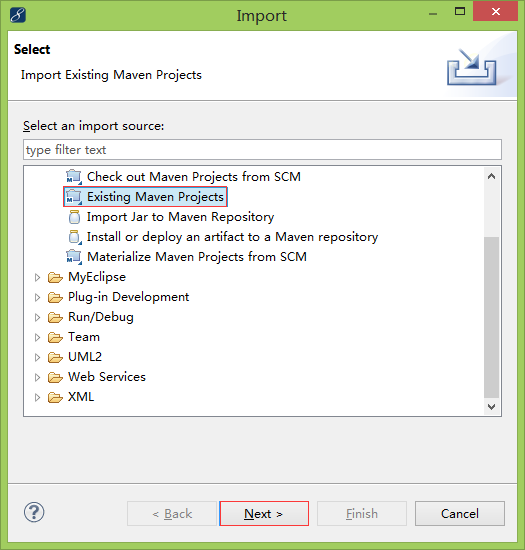
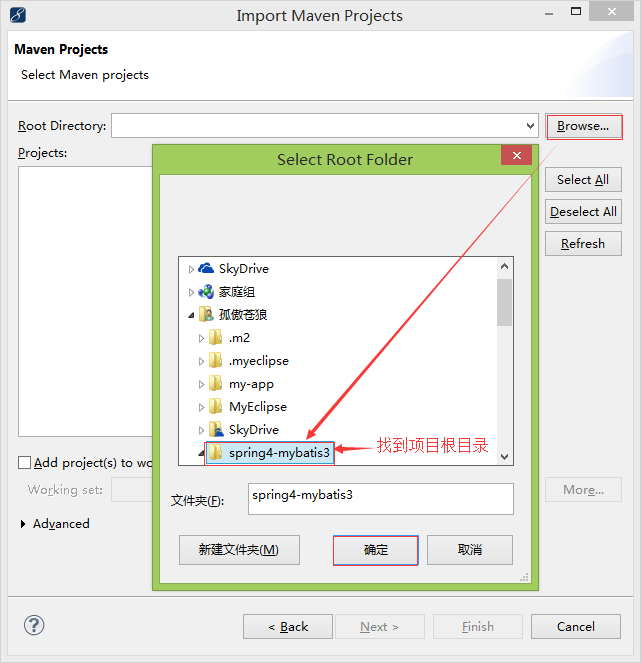
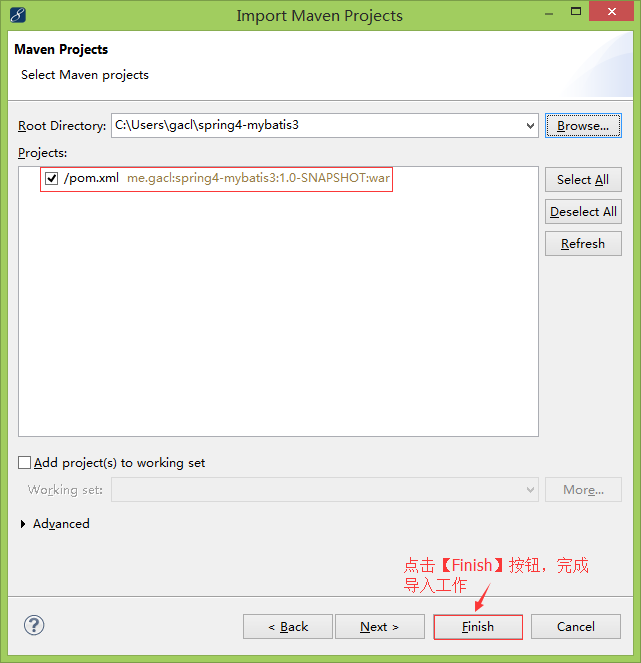
1.2、将创建好的项目导入MyEclipse中
具体操作步骤如下图所示:
手动创建【src/main/java】、【src/test/resources】、【src/test/java】这三个source folder,如下图所示:
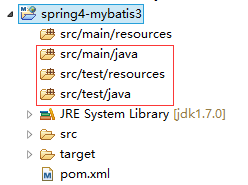
到此,项目搭建的工作就算是全部完成了。
二、创建数据库和表(针对MySQL)
SQL脚本如下:
Create DATABASE spring4_mybatis3;
USE spring4_mybatis3;

DROP TABLE IF EXISTS t_user;
CREATE TABLE t_user (
user_id char(32) NOT NULL,
user_name varchar(30) DEFAULT NULL,
user_birthday date DEFAULT NULL,
user_salary double DEFAULT NULL,
PRIMARY KEY (user_id)
) ENGINE=InnoDB DEFAULT CHARSET=utf8;
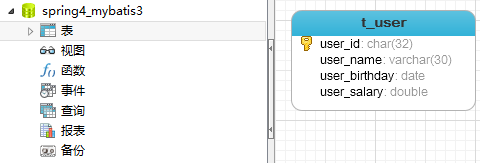
创建好的数据库和表如下:
三、使用generator工具生成代码
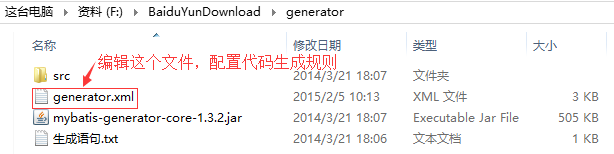
在网上找到了一个generator工具可以根据创建好的数据库表生成MyBatis的表对应的实体类,SQL映射文件和dao,找到generator工具根目录下的generator.xml文件,这个文件是用来配置代码生成规则的,如下图所示:
编辑generator.xml文件,内容如下:
 <?xml version="1.0" encoding="UTF-8"?>
 <!DOCTYPE generatorConfiguration PUBLIC "-//mybatis.org//DTD MyBatis Generator Configuration 1.0//EN" "http://mybatis.org/dtd/mybatis-generator-config_1_0.dtd">
 <generatorConfiguration>
     <!-- 数据库驱动包位置 -->
     <classPathEntry location="E:\repository\mysql\mysql-connector-java\5.1.34\mysql-connector-java-5.1.34.jar" />
     <!-- <classPathEntry location="C:\oracle\product\10.2.0\db_1\jdbc\lib\ojdbc14.jar" />-->
     <context id="DB2Tables" targetRuntime="MyBatis3">
         <commentGenerator>
             <property name="suppressAllComments" value="true" />
         </commentGenerator>
         <!-- 数据库链接URL、用户名、密码 -->
          <jdbcConnection driverClass="com.mysql.jdbc.Driver" connectionURL="jdbc:mysql://localhost:3306/spring4_mybatis3" userId="root" password="XDP">
         <!--<jdbcConnection driverClass="oracle.jdbc.driver.OracleDriver" connectionURL="jdbc:oracle:thin:@localhost:1521:orcl" userId="msa" password="msa">-->
         </jdbcConnection>
         <javaTypeResolver>
             <property name="forceBigDecimals" value="false" />
         </javaTypeResolver>
         <!-- 生成实体类的包名和位置,这里配置将生成的实体类放在me.gacl.domain这个包下 -->
         <javaModelGenerator targetPackage="me.gacl.domain" targetProject="C:\Users\gacl\spring4-mybatis3\src\main\java">
             <property name="enableSubPackages" value="true" />
             <property name="trimStrings" value="true" />
         </javaModelGenerator>
         <!-- 生成的SQL映射文件包名和位置,这里配置将生成的SQL映射文件放在me.gacl.mapping这个包下 -->
         <sqlMapGenerator targetPackage="me.gacl.mapping" targetProject="C:\Users\gacl\spring4-mybatis3\src\main\java">
             <property name="enableSubPackages" value="true" />
         </sqlMapGenerator>
         <!-- 生成DAO的包名和位置,这里配置将生成的dao类放在me.gacl.dao这个包下 -->
         <javaClientGenerator type="XMLMAPPER" targetPackage="me.gacl.dao" targetProject="C:\Users\gacl\spring4-mybatis3\src\main\java">
             <property name="enableSubPackages" value="true" />
         </javaClientGenerator>
         <!-- 要生成那些表(更改tableName和domainObjectName就可以) -->
         <table tableName="t_user" domainObjectName="User" enableCountByExample="false" enableUpdateByExample="false" enableDeleteByExample="false" enableSelectByExample="false" selectByExampleQueryId="false" />
     </context>
 </generatorConfiguration>
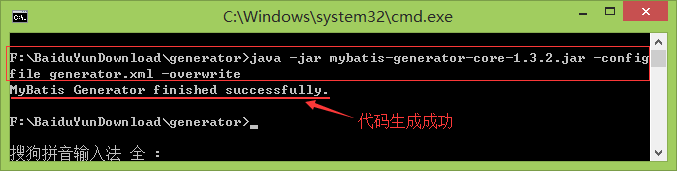
打开命令行窗口,切换到生成工具的根目录下,执行如下命令:
java -jar mybatis-generator-core-1.3.2.jar -configfile generator.xml -overwrite
如下图所示:
刚才我们在generator.xml文件中配置将生成的代码和SQL映射文件放到"C:\Users\gacl\spring4-mybatis3\src\main\java"这个目录下,这个目录就是我们的spring4-mybatis3项目所在目录,我们刷新一下src/main/java目录,就可以看到生成的代码和映射文件了,如下图所示:
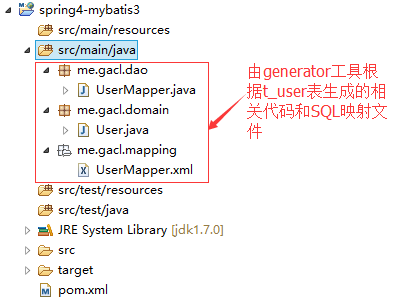
生成的代码和映射文件一行都不用改,可以直接应用到项目当中。下面我们看一眼由generator工具生成的代码和映射文件:
1、生成的dao类
 package me.gacl.dao;

 import me.gacl.domain.User;

 public interface UserMapper {
     int deleteByPrimaryKey(String userId);

     int insert(User record);

     int insertSelective(User record);

     User selectByPrimaryKey(String userId);

     int updateByPrimaryKeySelective(User record);

     int updateByPrimaryKey(User record);
 }
生成的UserMapper是一个接口,里面定义了一些操作t_user表的增删改查方法。
2、生成的实体类
 package me.gacl.domain;

 import java.util.Date;

 public class User {
     private String userId;

     private String userName;

     private Date userBirthday;

     private Double userSalary;

     public String getUserId() {
         return userId;
     }

     public void setUserId(String userId) {
         this.userId = userId == null ? null : userId.trim();
     }

     public String getUserName() {
         return userName;
     }

     public void setUserName(String userName) {
         this.userName = userName == null ? null : userName.trim();
     }

     public Date getUserBirthday() {
         return userBirthday;
     }

     public void setUserBirthday(Date userBirthday) {
         this.userBirthday = userBirthday;
     }

     public Double getUserSalary() {
         return userSalary;
     }

     public void setUserSalary(Double userSalary) {
         this.userSalary = userSalary;
     }
 }
User类是t_user表的对应的实体类,User类中定义的属性和t_user表中的字段一一对应。
3、生成的SQL映射文件
 <?xml version="1.0" encoding="UTF-8" ?>
 <!DOCTYPE mapper PUBLIC "-//mybatis.org//DTD Mapper 3.0//EN" "http://mybatis.org/dtd/mybatis-3-mapper.dtd" >
 <mapper namespace="me.gacl.dao.UserMapper" >
   <resultMap id="BaseResultMap" type="me.gacl.domain.User" >
     <id column="user_id" property="userId" jdbcType="CHAR" />
     <result column="user_name" property="userName" jdbcType="VARCHAR" />
     <result column="user_birthday" property="userBirthday" jdbcType="DATE" />
     <result column="user_salary" property="userSalary" jdbcType="DOUBLE" />
   </resultMap>
   <sql id="Base_Column_List" >
     user_id, user_name, user_birthday, user_salary
   </sql>
   <select id="selectByPrimaryKey" resultMap="BaseResultMap" parameterType="java.lang.String" >
     select
     <include refid="Base_Column_List" />
     from t_user
     where user_id = #{userId,jdbcType=CHAR}
   </select>
   <delete id="deleteByPrimaryKey" parameterType="java.lang.String" >
     delete from t_user
     where user_id = #{userId,jdbcType=CHAR}
   </delete>
   <insert id="insert" parameterType="me.gacl.domain.User" >
     insert into t_user (user_id, user_name, user_birthday,
       user_salary)
     values (#{userId,jdbcType=CHAR}, #{userName,jdbcType=VARCHAR}, #{userBirthday,jdbcType=DATE},
       #{userSalary,jdbcType=DOUBLE})
   </insert>
   <insert id="insertSelective" parameterType="me.gacl.domain.User" >
     insert into t_user
     <trim prefix="(" suffix=")" suffixOverrides="," >
       <if test="userId != null" >
         user_id,
       </if>
       <if test="userName != null" >
         user_name,
       </if>
       <if test="userBirthday != null" >
         user_birthday,
       </if>
       <if test="userSalary != null" >
         user_salary,
       </if>
     </trim>
     <trim prefix="values (" suffix=")" suffixOverrides="," >
       <if test="userId != null" >
         #{userId,jdbcType=CHAR},
       </if>
       <if test="userName != null" >
         #{userName,jdbcType=VARCHAR},
       </if>
       <if test="userBirthday != null" >
         #{userBirthday,jdbcType=DATE},
       </if>
       <if test="userSalary != null" >
         #{userSalary,jdbcType=DOUBLE},
       </if>
     </trim>
   </insert>
   <update id="updateByPrimaryKeySelective" parameterType="me.gacl.domain.User" >
     update t_user
     <set >
       <if test="userName != null" >
         user_name = #{userName,jdbcType=VARCHAR},
       </if>
       <if test="userBirthday != null" >
         user_birthday = #{userBirthday,jdbcType=DATE},
       </if>
       <if test="userSalary != null" >
         user_salary = #{userSalary,jdbcType=DOUBLE},
       </if>
     </set>
     where user_id = #{userId,jdbcType=CHAR}
   </update>
   <update id="updateByPrimaryKey" parameterType="me.gacl.domain.User" >
     update t_user
     set user_name = #{userName,jdbcType=VARCHAR},
       user_birthday = #{userBirthday,jdbcType=DATE},
       user_salary = #{userSalary,jdbcType=DOUBLE}
     where user_id = #{userId,jdbcType=CHAR}
   </update>
 </mapper>
UserMapper.xml这个文件的内容是编写操作t_user表的SQL语句,重点说一下UserMapper.xml配置中需要注意的几个小细节问题:
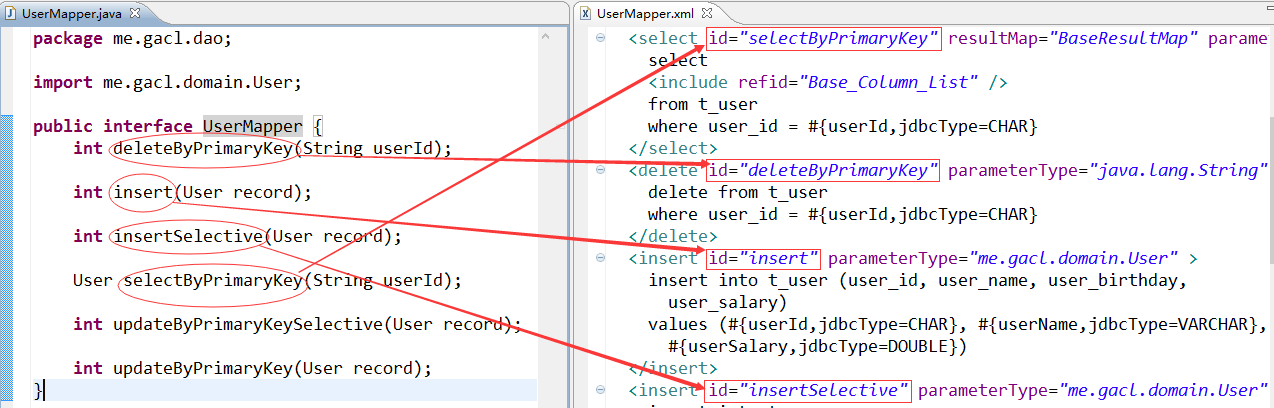
1、UserMapper.xml的<mapper>标签的namespace必须是UserMapper接口的全类名,既<mapper namespace="me.gacl.dao.UserMapper" >
2、UserMapper.xml的定义操作数据库的<select><delete><update><insert>这些标签的id属性的值必须和UserMapper接口定义的方法名一致,如下图所示:
之所以有上述说的这两点要求,就是为了能够让MyBatis能够根据UserMapper接口和UserMapper.xml文件去自动实现UserMapper接口中定义的相关方法,这样我们就不再需要针对UserMapper接口去编写具体的实现代码了。
四、Spring与MyBatis整合
首先我们要在项目中加入我们需要的相关jar包,我们可以到Maven的中央仓库:http://search.maven.org/ 找到我们要的相关jar包,如下图所示:
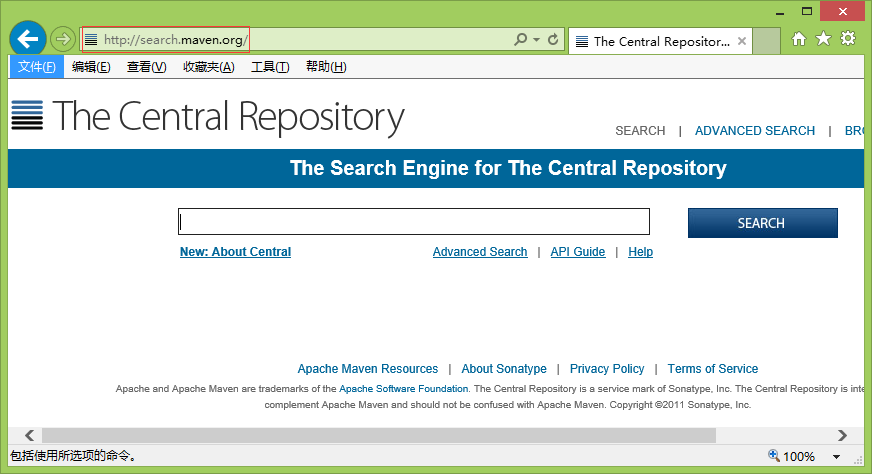
我们只需要在搜索框中输入要找的jar包的名称,点击【SEARCH】按钮,就可以找到我们要的jar包了。
4.1、添加Spring与Mybatis的相关jar包
1、添加spring-core,输入spring-core关键字进行查找,如下图所示:
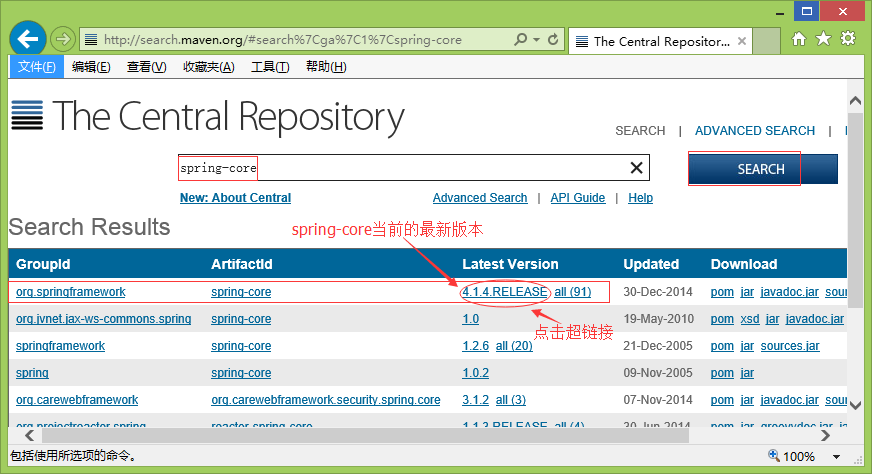
找到关于spring-core的依赖描述信息,如下图所示:
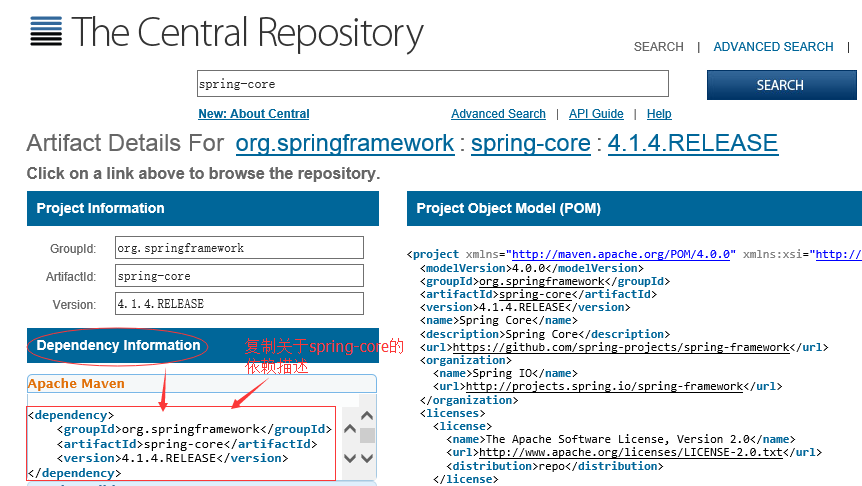
将
<dependency>
<groupId>org.springframework</groupId>
<artifactId>spring-core</artifactId>
<version>4.1.4.RELEASE</version>
</dependency>
复制到项目的pom.xml文件中,如下所示:
<project xmlns="http://maven.apache.org/POM/4.0.0" xmlns:xsi="http://www.w3.org/2001/XMLSchema-instance"
xsi:schemaLocation="http://maven.apache.org/POM/4.0.0 http://maven.apache.org/maven-v4_0_0.xsd">
<modelVersion>4.0.0</modelVersion>
<groupId>me.gacl</groupId>
<artifactId>spring4-mybatis3</artifactId>
<packaging>war</packaging>
<version>1.0-SNAPSHOT</version>
<name>spring4-mybatis3</name>
<url>http://maven.apache.org</url>
<dependencies>
<!-- 添加Spring4.1.4的核心包 -->
<dependency>
<groupId>org.springframework</groupId>
<artifactId>spring-core</artifactId>
<version>4.1.4.RELEASE</version>
</dependency>

</dependencies>
<build>
<finalName>spring4-mybatis3</finalName>
</build>
</project>
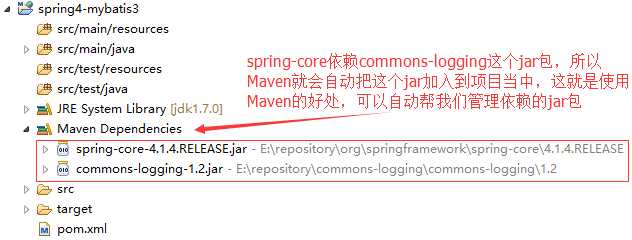
这样Maven就会自动帮我们从Maven的中央仓库中下载spring-core这个jar包到我们的本地仓库,然后将spring-core这个jar包以及它的相关依赖包加入到我们的项目当中,如下所示:
spring4.x与mybatis3.x所需要的相关jar包都可以采用上述所说的方式进行查找,然后添加到项目当中,添加完spring4.x与mybatis3.x相关jar包后,pom.xml文件内容最终如下:
 <project xmlns="http://maven.apache.org/POM/4.0.0" xmlns:xsi="http://www.w3.org/2001/XMLSchema-instance"
     xsi:schemaLocation="http://maven.apache.org/POM/4.0.0 http://maven.apache.org/maven-v4_0_0.xsd">
     <modelVersion>4.0.0</modelVersion>
     <groupId>me.gacl</groupId>
     <artifactId>spring4-mybatis3</artifactId>
     <packaging>war</packaging>
     <version>1.0-SNAPSHOT</version>
     <name>spring4-mybatis3</name>
     <url>http://maven.apache.org</url>
     <dependencies>
         <!-- 添加Spring-core包 -->
         <dependency>
             <groupId>org.springframework</groupId>
             <artifactId>spring-core</artifactId>
             <version>4.1.4.RELEASE</version>
         </dependency>
         <!-- 添加spring-context包 -->
         <dependency>
             <groupId>org.springframework</groupId>
             <artifactId>spring-context</artifactId>
             <version>4.1.4.RELEASE</version>
         </dependency>
         <!-- 添加spring-tx包 -->
         <dependency>
             <groupId>org.springframework</groupId>
             <artifactId>spring-tx</artifactId>
             <version>4.1.4.RELEASE</version>
         </dependency>
         <!-- 添加spring-jdbc包 -->
         <dependency>
             <groupId>org.springframework</groupId>
             <artifactId>spring-jdbc</artifactId>
             <version>4.1.4.RELEASE</version>
         </dependency>
         <!-- 为了方便进行单元测试,添加spring-test包 -->
         <dependency>
             <groupId>org.springframework</groupId>
             <artifactId>spring-test</artifactId>
             <version>4.1.4.RELEASE</version>
         </dependency>
         <!--添加spring-web包 -->
         <dependency>
             <groupId>org.springframework</groupId>
             <artifactId>spring-web</artifactId>
             <version>4.1.4.RELEASE</version>
         </dependency>
         <!--添加aspectjweaver包 -->
         <dependency>
             <groupId>org.aspectj</groupId>
             <artifactId>aspectjweaver</artifactId>
             <version>1.8.5</version>
         </dependency>
         <!-- 添加mybatis的核心包 -->
         <dependency>
             <groupId>org.mybatis</groupId>
             <artifactId>mybatis</artifactId>
             <version>3.2.8</version>
         </dependency>
         <!-- 添加mybatis与Spring整合的核心包 -->
         <dependency>
             <groupId>org.mybatis</groupId>
             <artifactId>mybatis-spring</artifactId>
             <version>1.2.2</version>
         </dependency>
         <!-- 添加servlet3.0核心包 -->
         <dependency>
             <groupId>javax.servlet</groupId>
             <artifactId>javax.servlet-api</artifactId>
             <version>3.0.1</version>
         </dependency>
         <dependency>
             <groupId>javax.servlet.jsp</groupId>
             <artifactId>javax.servlet.jsp-api</artifactId>
             <version>2.3.2-b01</version>
         </dependency>
         <!-- jstl -->
         <dependency>
             <groupId>javax.servlet</groupId>
             <artifactId>jstl</artifactId>
             <version>1.2</version>
         </dependency>
         <!-- 添加mysql驱动包 -->
         <dependency>
             <groupId>mysql</groupId>
             <artifactId>mysql-connector-java</artifactId>
             <version>5.1.34</version>
         </dependency>
         <!-- 添加druid连接池包 -->
         <dependency>
             <groupId>com.alibaba</groupId>
             <artifactId>druid</artifactId>
             <version>1.0.12</version>
         </dependency>
         <!-- 添加junit单元测试包 -->
         <dependency>
             <groupId>junit</groupId>
             <artifactId>junit</artifactId>
             <version>4.12</version>
             <scope>test</scope>
         </dependency>
     </dependencies>
     <build>
         <finalName>spring4-mybatis3</finalName>
     </build>
 </project>

4.2、编写相关配置文件
1、dbconfig.properties
在src/main/resources目录下创建一个dbconfig.properties文件,用于编写连接MySQL数据库的相关信息,dbconfig.properties的内容如下:
driverClassName=com.mysql.jdbc.Driver
validationQuery=SELECT 1
jdbc_url=jdbc:mysql://localhost:3306/spring4_mybatis3?useUnicode=true&characterEncoding=UTF-8&zeroDateTimeBehavior=convertToNull
jdbc_username=root
jdbc_password=XDP
2、spring.xml(spring框架的配置文件)
在src/main/resources目录下创建一个spring.xml文件,spring.xml文件就是针对Spring框架编写的核心配置文件,spring.xml的内容如下:
<?xml version="1.0" encoding="UTF-8"?>
<beans xmlns="http://www.springframework.org/schema/beans"
xmlns:xsi="http://www.w3.org/2001/XMLSchema-instance" xmlns:context="http://www.springframework.org/schema/context"
xsi:schemaLocation="
http://www.springframework.org/schema/beans
http://www.springframework.org/schema/beans/spring-beans-3.0.xsd
http://www.springframework.org/schema/context
http://www.springframework.org/schema/context/spring-context-3.0.xsd">

<!-- 引入dbconfig.properties属性文件 -->
<context:property-placeholder location="classpath:dbconfig.properties" />
<!-- 自动扫描(自动注入),扫描me.gacl.service这个包以及它的子包的所有使用@Service注解标注的类 -->
<context:component-scan base-package="me.gacl.service" />
</beans>
我们的spring.xml文件的配置非常简单,就两个配置。
3、spring-mybatis.xml(spring与mybatis整合的配置文件)
在src/main/resources目录下创建一个spring-mybatis.xml文件,spring-mybatis.xml文件就是针对Spring框架与Mybatis框架整合编写的配置文件,spring-mybatis.xml的内容如下:
<?xml version="1.0" encoding="UTF-8"?>
<beans xmlns="http://www.springframework.org/schema/beans" xmlns:xsi="http://www.w3.org/2001/XMLSchema-instance" xmlns:tx="http://www.springframework.org/schema/tx" xmlns:aop="http://www.springframework.org/schema/aop" xsi:schemaLocation="
http://www.springframework.org/schema/beans
http://www.springframework.org/schema/beans/spring-beans-3.0.xsd
http://www.springframework.org/schema/tx
http://www.springframework.org/schema/tx/spring-tx-3.0.xsd
http://www.springframework.org/schema/aop
http://www.springframework.org/schema/aop/spring-aop-3.0.xsd
">

<!-- JNDI方式配置数据源 -->
<!-- <bean id="dataSource" class="org.springframework.jndi.JndiObjectFactoryBean"> <property name="jndiName" value="${jndiName}"></property> </bean> -->
<!-- ========================================配置数据源========================================= -->
<!-- 配置数据源,使用的是alibaba的Druid(德鲁伊)数据源 -->
<bean name="dataSource" class="com.alibaba.druid.pool.DruidDataSource" init-method="init" destroy-method="close">
<property name="url" value="${jdbc_url}" />
<property name="username" value="${jdbc_username}" />
<property name="password" value="${jdbc_password}" />
<!-- 初始化连接大小 -->
<property name="initialSize" value="0" />
<!-- 连接池最大使用连接数量 -->
<property name="maxActive" value="20" />
<!-- 连接池最大空闲 -->
<property name="maxIdle" value="20" />
<!-- 连接池最小空闲 -->
<property name="minIdle" value="0" />
<!-- 获取连接最大等待时间 -->
<property name="maxWait" value="60000" />
<!--
<property name="poolPreparedStatements" value="true" />
<property name="maxPoolPreparedStatementPerConnectionSize" value="33" />
-->
<property name="validationQuery" value="${validationQuery}" />
<property name="testOnBorrow" value="false" />
<property name="testOnReturn" value="false" />
<property name="testWhileIdle" value="true" />
<!-- 配置间隔多久才进行一次检测,检测需要关闭的空闲连接,单位是毫秒 -->
<property name="timeBetweenEvictionRunsMillis" value="60000" />
<!-- 配置一个连接在池中最小生存的时间,单位是毫秒 -->
<property name="minEvictableIdleTimeMillis" value="25200000" />
<!-- 打开removeAbandoned功能 -->
<property name="removeAbandoned" value="true" />
<!-- 1800秒,也就是30分钟 -->
<property name="removeAbandonedTimeout" value="1800" />
<!-- 关闭abanded连接时输出错误日志 -->
<property name="logAbandoned" value="true" />
<!-- 监控数据库 -->
<!-- <property name="filters" value="stat" /> -->
<property name="filters" value="mergeStat" />
</bean>

<!-- ========================================分隔线========================================= -->

<!-- ========================================针对myBatis的配置项============================== -->
<!-- 配置sqlSessionFactory -->
<bean id="sqlSessionFactory" class="org.mybatis.spring.SqlSessionFactoryBean">
<!-- 实例化sqlSessionFactory时需要使用上述配置好的数据源以及SQL映射文件 -->
<property name="dataSource" ref="dataSource" />
<!-- 自动扫描me/gacl/mapping/目录下的所有SQL映射的xml文件, 省掉Configuration.xml里的手工配置
value="classpath:me/gacl/mapping/*.xml"指的是classpath(类路径)下me.gacl.mapping包中的所有xml文件
UserMapper.xml位于me.gacl.mapping包下,这样UserMapper.xml就可以被自动扫描
-->
<property name="mapperLocations" value="classpath:me/gacl/mapping/*.xml" />
</bean>
<!-- 配置扫描器 -->
<bean class="org.mybatis.spring.mapper.MapperScannerConfigurer">
<!-- 扫描me.gacl.dao这个包以及它的子包下的所有映射接口类 -->
<property name="basePackage" value="me.gacl.dao" />
<property name="sqlSessionFactoryBeanName" value="sqlSessionFactory" />
</bean>

<!-- ========================================分隔线========================================= -->
<!-- 配置Spring的事务管理器 -->
<bean id="transactionManager" class="org.springframework.jdbc.datasource.DataSourceTransactionManager">
<property name="dataSource" ref="dataSource" />
</bean>

<!-- 注解方式配置事物 -->
<!-- <tx:annotation-driven transaction-manager="transactionManager" /> -->

<!-- 拦截器方式配置事物 -->
<tx:advice id="transactionAdvice" transaction-manager="transactionManager">
<tx:attributes>
<tx:method name="add*" propagation="REQUIRED" />
<tx:method name="append*" propagation="REQUIRED" />
<tx:method name="insert*" propagation="REQUIRED" />
<tx:method name="save*" propagation="REQUIRED" />
<tx:method name="update*" propagation="REQUIRED" />
<tx:method name="modify*" propagation="REQUIRED" />
<tx:method name="edit*" propagation="REQUIRED" />
<tx:method name="delete*" propagation="REQUIRED" />
<tx:method name="remove*" propagation="REQUIRED" />
<tx:method name="repair" propagation="REQUIRED" />
<tx:method name="delAndRepair" propagation="REQUIRED" />

<tx:method name="get*" propagation="SUPPORTS" />
<tx:method name="find*" propagation="SUPPORTS" />
<tx:method name="load*" propagation="SUPPORTS" />
<tx:method name="search*" propagation="SUPPORTS" />
<tx:method name="datagrid*" propagation="SUPPORTS" />

<tx:method name="*" propagation="SUPPORTS" />
</tx:attributes>
</tx:advice>
<aop:config>
<aop:pointcut id="transactionPointcut" expression="execution(* me.gacl.service..*Impl.*(..))" />
<aop:advisor pointcut-ref="transactionPointcut" advice-ref="transactionAdvice" />
</aop:config>


<!-- 配置druid监控spring jdbc -->
<bean id="druid-stat-interceptor" class="com.alibaba.druid.support.spring.stat.DruidStatInterceptor">
</bean>
<bean id="druid-stat-pointcut" class="org.springframework.aop.support.JdkRegexpMethodPointcut" scope="prototype">
<property name="patterns">
<list>
<value>me.gacl.service.*</value>
</list>
</property>
</bean>
<aop:config>
<aop:advisor advice-ref="druid-stat-interceptor" pointcut-ref="druid-stat-pointcut" />
</aop:config>

</beans>
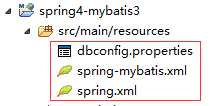
到此,相关的配置文件算是编写完成了,如下图所示:
4.3、进行单元测试
经过以上两个步骤,spring4与mybatis3的整合算是全部完成了。接下来我们要做的工作就算进行单元测试,测试一下spring4与mybatis3的整合是否成功。
1、在src/main/java目录下创建一个me.gacl.service包,然后在me.gacl.service包创建一个UserServiceI接口,如下所示:
 package me.gacl.service;

 import me.gacl.domain.User;

 public interface UserServiceI {

     /**
      * 添加用户
      * @param user
      */
     void addUser(User user);

     /**
      * 根据用户id获取用户
      * @param userId
      * @return
      */
     User getUserById(String userId);
 }
2、在src/main/java目录下创建一个me.gacl.service.impl包,然后在me.gacl.service.impl包创建一个针对UserServiceI接口的实现类:UserServiceImpl,如下所示:
 package me.gacl.service.impl;

 import org.springframework.beans.factory.annotation.Autowired;
 import org.springframework.stereotype.Service;
 import me.gacl.dao.UserMapper;
 import me.gacl.domain.User;
 import me.gacl.service.UserServiceI;

 /**
  * @author gacl
  * 使用@Service注解将UserServiceImpl类标注为一个service
  * service的id是userService
  */
 @Service("userService")
 public class UserServiceImpl implements UserServiceI {

     /**
      * 使用@Autowired注解标注userMapper变量,
      * 当需要使用UserMapper时,Spring就会自动注入UserMapper
      */
     @Autowired
     private UserMapper userMapper;//注入dao

     @Override
     public void addUser(User user) {
         userMapper.insert(user);
     }

     @Override
     public User getUserById(String userId) {
         return userMapper.selectByPrimaryKey(userId);
     }
 }
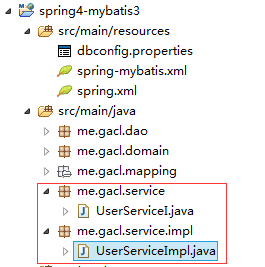
创建好的两个类如下所示:
3、在src/test/java目录下编写单元测试类,新建一个me.gacl.test包,然后在这个包下创建一个MyBatisTest类,代码如下:
 package me.gacl.test;

 import java.util.Date;
 import java.util.UUID;
 import me.gacl.domain.User;
 import me.gacl.service.UserServiceI;
 //import me.gacl.service.UserServiceI;
 import org.junit.Before;
 import org.junit.Test;
 import org.springframework.context.ApplicationContext;
 import org.springframework.context.support.ClassPathXmlApplicationContext;

 public class MyBatisTest {

     private UserServiceI userService;

     /**
      * 这个before方法在所有的测试方法之前执行,并且只执行一次
      * 所有做Junit单元测试时一些初始化工作可以在这个方法里面进行
      * 比如在before方法里面初始化ApplicationContext和userService
      */
     @Before
     public void before(){
         //使用"spring.xml"和"spring-mybatis.xml"这两个配置文件创建Spring上下文
         ApplicationContext ac = new ClassPathXmlApplicationContext(new String[]{"spring.xml","spring-mybatis.xml"});
         //从Spring容器中根据bean的id取出我们要使用的userService对象
         userService = (UserServiceI) ac.getBean("userService");
     }

     @Test
     public void testAddUser(){
         //ApplicationContext ac = new ClassPathXmlApplicationContext(new String[]{"spring.xml","spring-mybatis.xml"});
         //UserServiceI userService = (UserServiceI) ac.getBean("userService");
         User user = new User();
         user.setUserId(UUID.randomUUID().toString().replaceAll("-", ""));
         user.setUserName("白虎神皇xdp");
         user.setUserBirthday(new Date());
         user.setUserSalary(10000D);
         userService.addUser(user);
     }

 }
执行单元测试代码,这时候会报如下错误:
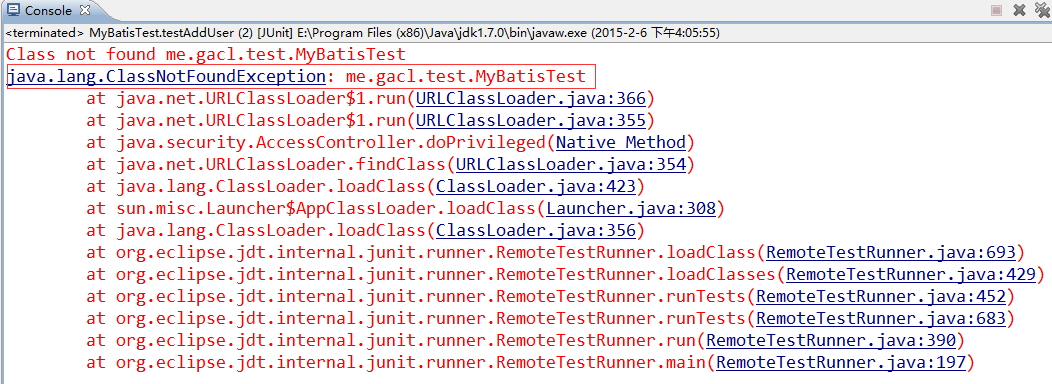
错误提示是说没有找到"me.gacl.test.MyBatisTest"这个类,这是因为我们没有使用maven编译项目中的类的缘故。
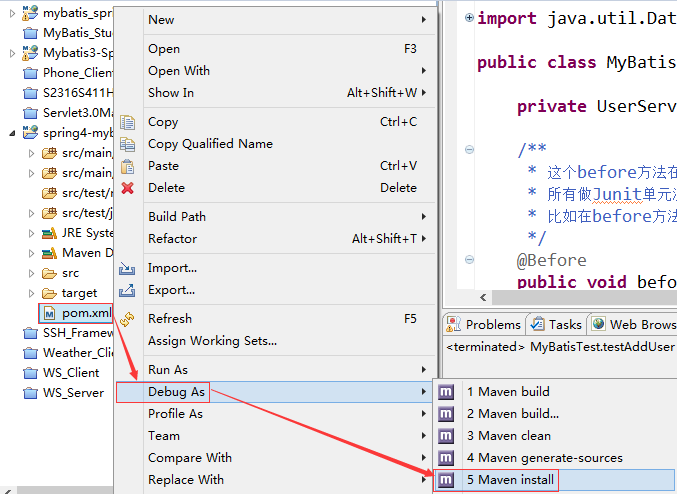
下面我们使用Maven编译项目,选中项目的pom.xml文件→【Debug As】→【maven install】,如下所示:
编译结果如下:
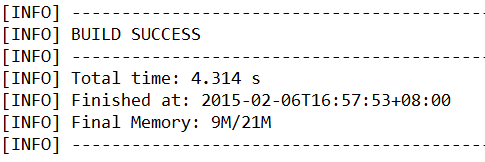
在这里说一下我执行Maven install之后遇到的问题,第一次执行Maven install命令时,就出现了如下一堆乱七八糟的错误:
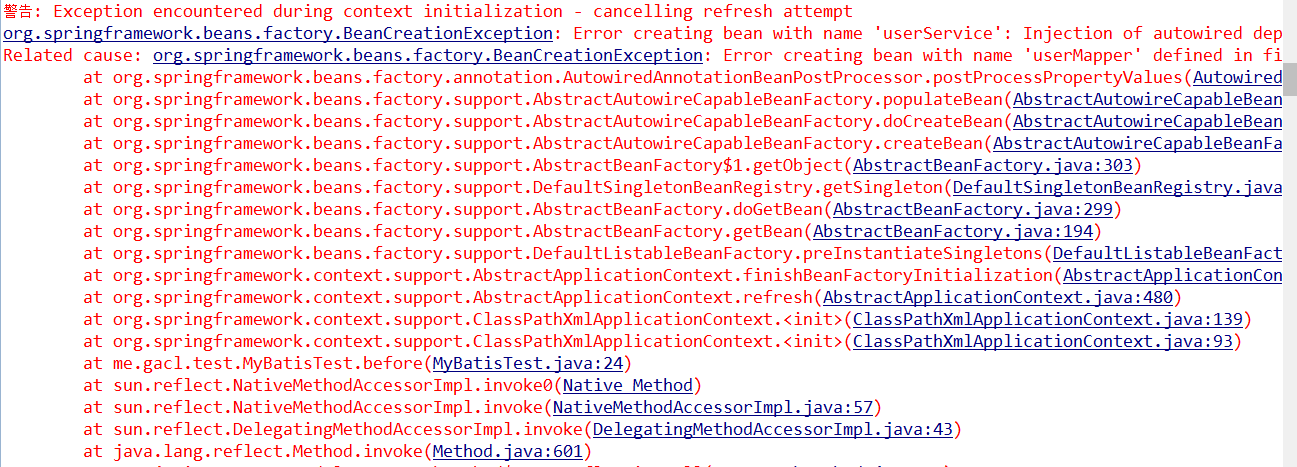
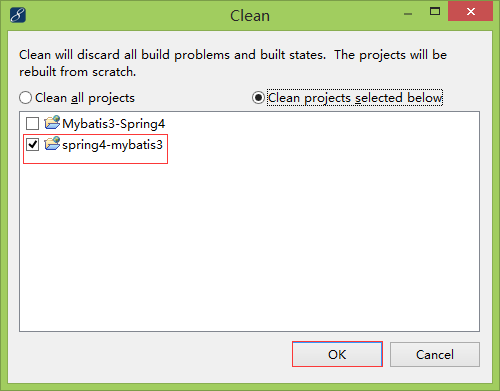
后来我把项目删掉,再重新导入项目,然后再执行Clean项目操作之后,如下图所示:
再执行Maven install操作又可以正常编译通过了,这让我郁闷了好久,这应该不是我项目配置的原因,而是Maven的原因,具体也不知道为啥会这样。反正这算是一种解决办法吧,如果遇到执行Maven install操作不能正常编译通过的情况:可以尝试采用:Maven clean→Clean项目→Maven install这三个步骤去解决问题。
除了可以用常规的Junit进行单元测试之外,我们还可以使用Spring提供的Junit测试框架进行单元测试,在me.gacl.test下新建一个MyBatisTestBySpringTestFramework类,代码如下:
 package me.gacl.test;

 import java.util.Date;
 import java.util.UUID;
 import me.gacl.domain.User;
 import me.gacl.service.UserServiceI;
 import org.junit.Test;
 import org.junit.runner.RunWith;
 import org.springframework.beans.factory.annotation.Autowired;
 import org.springframework.test.context.ContextConfiguration;
 import org.springframework.test.context.junit4.SpringJUnit4ClassRunner;

 @RunWith(SpringJUnit4ClassRunner.class)
 //配置了@ContextConfiguration注解并使用该注解的locations属性指明spring和配置文件之后,
 @ContextConfiguration(locations = {"classpath:spring.xml", "classpath:spring-mybatis.xml" })
 public class MyBatisTestBySpringTestFramework {

     //注入userService
     @Autowired
     private UserServiceI userService;

     @Test
     public void testAddUser(){
         User user = new User();
         user.setUserId(UUID.randomUUID().toString().replaceAll("-", ""));
         user.setUserName("xdp_gacl_白虎神皇");
         user.setUserBirthday(new Date());
         user.setUserSalary(10000D);
         userService.addUser(user);
     }

     @Test
     public void testGetUserById(){
         String userId = "fb1c5941094e400b975f10d9a9d602a3";
         User user = userService.getUserById(userId);
         System.out.println(user.getUserName());
     }
 }
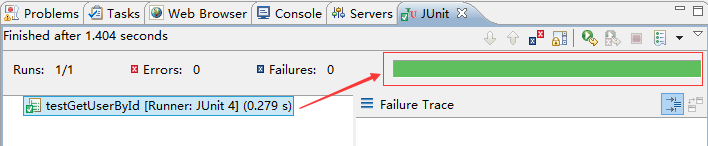
执行这两个测试方法,是可以正常测试通过的,如下所示:

到此,我们框架的整合测试工作就算是全部通过了,整合成功。
4.4、在web服务器中进行测试
1、编辑web.xml文件,添加spring监听器配置项,内容如下:
<?xml version="1.0" encoding="UTF-8"?>
<web-app xmlns="http://java.sun.com/xml/ns/javaee" xmlns:xsi="http://www.w3.org/2001/XMLSchema-instance"
xsi:schemaLocation="http://java.sun.com/xml/ns/javaee
http://java.sun.com/xml/ns/javaee/web-app_3_0.xsd"
version="3.0">
<welcome-file-list>
<welcome-file>index.jsp</welcome-file>
</welcome-file-list>

<listener>
<description>Spring监听器</description>
<listener-class>org.springframework.web.context.ContextLoaderListener</listener-class>
</listener>
<!-- ContextLoaderListener初始化Spring上下文时需要使用到的contextConfigLocation参数 -->
<context-param>
<param-name>contextConfigLocation</param-name>
<!-- 配置spring.xml和spring-mybatis.xml这两个配置文件的位置,固定写法 -->
<param-value>classpath:spring.xml,classpath:spring-mybatis.xml</param-value>
</context-param>
</web-app>
2、在UserMapper接口中添加一个获取所有用户信息的getAllUser()方法,如下所示:
 package me.gacl.dao;

 import java.util.List;

 import me.gacl.domain.User;

 public interface UserMapper {
     int deleteByPrimaryKey(String userId);

     int insert(User record);

     int insertSelective(User record);

     User selectByPrimaryKey(String userId);

     int updateByPrimaryKeySelective(User record);

     int updateByPrimaryKey(User record);

     /**获取所有用户信息
      * @return List<User>
      */
     List<User> getAllUser();
 }
3、在UserMapper.xml文件中编写getAllUser()方法要执行的SQL语句,如下所示:
<?xml version="1.0" encoding="UTF-8" ?>
<!DOCTYPE mapper PUBLIC "-//mybatis.org//DTD Mapper 3.0//EN" "http://mybatis.org/dtd/mybatis-3-mapper.dtd" >
<mapper namespace="me.gacl.dao.UserMapper" >
<resultMap id="BaseResultMap" type="me.gacl.domain.User" >
<id column="user_id" property="userId" jdbcType="CHAR" />
<result column="user_name" property="userName" jdbcType="VARCHAR" />
<result column="user_birthday" property="userBirthday" jdbcType="DATE" />
<result column="user_salary" property="userSalary" jdbcType="DOUBLE" />
</resultMap>
<sql id="Base_Column_List" >
user_id, user_name, user_birthday, user_salary
</sql>
<select id="selectByPrimaryKey" resultMap="BaseResultMap" parameterType="java.lang.String" >
select
<include refid="Base_Column_List" />
from t_user
where user_id = #{userId,jdbcType=CHAR}
</select>
<delete id="deleteByPrimaryKey" parameterType="java.lang.String" >
delete from t_user
where user_id = #{userId,jdbcType=CHAR}
</delete>
<insert id="insert" parameterType="me.gacl.domain.User" >
insert into t_user (user_id, user_name, user_birthday,
user_salary)
values (#{userId,jdbcType=CHAR}, #{userName,jdbcType=VARCHAR}, #{userBirthday,jdbcType=DATE},
#{userSalary,jdbcType=DOUBLE})
</insert>
<insert id="insertSelective" parameterType="me.gacl.domain.User" >
insert into t_user
<trim prefix="(" suffix=")" suffixOverrides="," >
<if test="userId != null" >
user_id,
</if>
<if test="userName != null" >
user_name,
</if>
<if test="userBirthday != null" >
user_birthday,
</if>
<if test="userSalary != null" >
user_salary,
</if>
</trim>
<trim prefix="values (" suffix=")" suffixOverrides="," >
<if test="userId != null" >
#{userId,jdbcType=CHAR},
</if>
<if test="userName != null" >
#{userName,jdbcType=VARCHAR},
</if>
<if test="userBirthday != null" >
#{userBirthday,jdbcType=DATE},
</if>
<if test="userSalary != null" >
#{userSalary,jdbcType=DOUBLE},
</if>
</trim>
</insert>
<update id="updateByPrimaryKeySelective" parameterType="me.gacl.domain.User" >
update t_user
<set >
<if test="userName != null" >
user_name = #{userName,jdbcType=VARCHAR},
</if>
<if test="userBirthday != null" >
user_birthday = #{userBirthday,jdbcType=DATE},
</if>
<if test="userSalary != null" >
user_salary = #{userSalary,jdbcType=DOUBLE},
</if>
</set>
where user_id = #{userId,jdbcType=CHAR}
</update>
<update id="updateByPrimaryKey" parameterType="me.gacl.domain.User" >
update t_user
set user_name = #{userName,jdbcType=VARCHAR},
user_birthday = #{userBirthday,jdbcType=DATE},
user_salary = #{userSalary,jdbcType=DOUBLE}
where user_id = #{userId,jdbcType=CHAR}
</update>

<!-- ==============以下内容是根据自身业务扩展的内容======================= -->
<!-- select标签的id属性与UserMapper接口中定义的getAllUser方法要一模一样 -->
<select id="getAllUser" resultMap="BaseResultMap">
select user_id, user_name, user_birthday, user_salary from t_user
</select>
</mapper>
4、在UserServiceI接口中也添加一个getAllUser()方法,如下:
 package me.gacl.service;

 import java.util.List;

 import me.gacl.domain.User;

 public interface UserServiceI {

     /**
      * 添加用户
      * @param user
      */
     void addUser(User user);

     /**
      * 根据用户id获取用户
      * @param userId
      * @return
      */
     User getUserById(String userId);

     /**获取所有用户信息
      * @return List<User>
      */
     List<User> getAllUser();
 }
5、在UserServiceImpl类中实现getAllUser方法,如下:
 package me.gacl.service.impl;

 import java.util.List;

 import org.springframework.beans.factory.annotation.Autowired;
 import org.springframework.stereotype.Service;
 import me.gacl.dao.UserMapper;
 import me.gacl.domain.User;
 import me.gacl.service.UserServiceI;

 /**
  * @author gacl
  * 使用@Service注解将UserServiceImpl类标注为一个service
  * service的id是userService
  */
 @Service("userService")
 public class UserServiceImpl implements UserServiceI {

     /**
      * 使用@Autowired注解标注userMapper变量,
      * 当需要使用UserMapper时,Spring就会自动注入UserMapper
      */
     @Autowired
     private UserMapper userMapper;//注入dao

     @Override
     public void addUser(User user) {
         userMapper.insert(user);
     }

     @Override
     public User getUserById(String userId) {
         return userMapper.selectByPrimaryKey(userId);
     }

     @Override
     public List<User> getAllUser() {
         return userMapper.getAllUser();
     }
 }
6、在src/main/java目录下创建一个me.gacl.web.controller包,然后在me.gacl.web.controller下创建一个UserServlet,如下:
 package me.gacl.web.controller;

 import java.io.IOException;
 import java.util.List;

 import javax.servlet.ServletException;
 import javax.servlet.annotation.WebServlet;
 import javax.servlet.http.HttpServlet;
 import javax.servlet.http.HttpServletRequest;
 import javax.servlet.http.HttpServletResponse;

 import org.springframework.context.ApplicationContext;
 import org.springframework.web.context.support.WebApplicationContextUtils;

 import me.gacl.domain.User;
 import me.gacl.service.UserServiceI;

 /**
  * @author gacl
  * @WebServlet是Servlet3.0提供的注解,目的是将一个继承了HttpServlet类的普通java类标注为一个Servlet
  * UserServlet使用了@WebServlet标注之后,就不需要在web.xml中配置了
  */
 @WebServlet("/UserServlet")
 public class UserServlet extends HttpServlet {

     //处理业务逻辑的userService
     private UserServiceI userService;

     public void doGet(HttpServletRequest request, HttpServletResponse response)
             throws ServletException, IOException {
         //获取所有的用户信息
         List<User> lstUsers = userService.getAllUser();
         request.setAttribute("lstUsers", lstUsers);
         request.getRequestDispatcher("/index.jsp").forward(request, response);
     }

     public void doPost(HttpServletRequest request, HttpServletResponse response)
             throws ServletException, IOException {
         this.doGet(request, response);
     }

     public void init() throws ServletException {
         //在Servlet初始化时获取Spring上下文对象(ApplicationContext)
         ApplicationContext ac = WebApplicationContextUtils.getWebApplicationContext(this.getServletContext());
         //从ApplicationContext中获取userService
         userService = (UserServiceI) ac.getBean("userService");
     }
 }
7、编辑index.jsp页面,用于展示查询到的用户信息,内容如下:
<%@ page language="java" pageEncoding="UTF-8"%>
<%--引入JSTL核心标签库 --%>
<%@ taglib prefix="c" uri="http://java.sun.com/jsp/jstl/core"%>
<!DOCTYPE html>
<html>
<head>
<title>显示用户信息</title>
<style type="text/css">
table,td{
border: 1px solid;
border-collapse: collapse;
}
</style>
</head>
<body>
| 用户ID|用户名|用户生日|工资|
| :-----: | :-----: | :-----: | :-----: |
| 用户ID | 用户名 | 用户生日 | 工资 |
| ${user.userId} | ${user.userName} | ${user.userBirthday} | ${user.userSalary} |

</body>
</html>
8、执行maven install命令编译项目,然后将项目部署到tomcat服务器中运行,注意,由于要使用Servlet3.0,所以必须将项目部署到tomcat7.x以上的服务器中去运行,如下所示:

输入地址:http://localhost:8080/spring4-mybatis3/UserServlet 访问UserServlet,访问结果如下:

可以看到,t_user表中的用户信息全部查询出来显示到页面上了。这样在web服务器中的测试也正常通过了。
以上就是Spring4.x与MyBatis3.x整合的全部内容了。编写这个整合例子花了不少时间,使用Maven编译时总是出现莫名其妙的问题,有时候成功,有时候失败,反正很莫名其妙。如果遇到执行Maven install操作不能正常编译通过的情况:可以尝试采用:Maven clean→Clean项目→Maven install这三个步骤去解决问题
作者:孤傲苍狼
来源:https://www.cnblogs.com/xdp-gacl/p/4271627.html
看完两件小事
如果你觉得这篇文章对你挺有启发,我想请你帮我两个小忙:
- 把这篇文章分享给你的朋友 / 交流群,让更多的人看到,一起进步,一起成长!
- 关注公众号 「方志朋」,公众号后台回复「666」 免费领取我精心整理的进阶资源教程

本文著作权归作者所有,如若转载,请注明出处
转载请注明:文章转载自「 Java极客技术学习 」https://www.javajike.com
 微信扫一扫
微信扫一扫