
SpringBoot教程第10篇:restdoc
这篇文章将带你了解如何用spring官方推荐的restdoc去生成api文档。本文创建一个简单的springboot工程,将http接口通过Api文档暴露出来。只需要通过 JUnit单元测试和Spring的MockMVC就可以生成文档。
准备工作
- 你需要15min
- Jdk 1.8
- maven 3.0+
- idea
创建工程
引入依赖,其pom文件:
<dependencies>
        <dependency>
            <groupId>org.springframework.boot</groupId>
            <artifactId>spring-boot-starter-web</artifactId>
        </dependency>

        <dependency>
            <groupId>org.springframework.boot</groupId>
            <artifactId>spring-boot-starter-test</artifactId>
            <scope>test</scope>
        </dependency>

        <dependency>
            <groupId>org.springframework.restdocs</groupId>
            <artifactId>spring-restdocs-mockmvc</artifactId>
            <scope>test</scope>
        </dependency>
    </dependencies>
通过@SpringBootApplication,开启springboot
@SpringBootApplication
public class Application {

    public static void main(String[] args) {
        SpringApplication.run(Application.class, args);
    }
}
在springboot通常创建一个controller:
@RestController
public class HomeController {

    @GetMapping("/")
    public Map<String, Object> greeting() {
        return Collections.singletonMap("message", "Hello World");
    }

}
启动工程,访问localhost:8080,浏览器显示:
{"message":"Hello World"}
证明接口已经写好了,但是如何通过restdoc生存api文档呢
Restdoc,通过单元测试生成api文档
restdocs是通过单元测试生存snippets文件,然后snippets根据插件生成htm文档的。
建一个单元测试类:
@RunWith(SpringRunner.class)
@WebMvcTest(HomeController.class)
@AutoConfigureRestDocs(outputDir = "target/snippets")
public class WebLayerTest {

    @Autowired
    private MockMvc mockMvc;

    @Test
    public void shouldReturnDefaultMessage() throws Exception {
        this.mockMvc.perform(get("/")).andDo(print()).andExpect(status().isOk())
                .andExpect(content().string(containsString("Hello World")))
                .andDo(document("home"));
    }
}
其中,@ AutoConfigureRestDocs注解开启了生成snippets文件,并指定了存放位置。
启动单元测试,测试通过,你会发现在target文件下生成了一个snippets文件夹,其目录结构如下:
└── target
    └── snippets
        └── home
            └── httpie-request.adoc
            └── curl-request.adoc
            └── http-request.adoc
            └── http-response.adoc
默认情况下,snippets是Asciidoctor格式的文件,包括request和reponse,另外其他两种httpie和curl两种流行的命令行的http请求模式。
到目前为止,只生成了Snippets文件,需要用Snippets文件生成文档。
怎么用Snippets
创建一个新文件src/main/asciidoc/index.adoc :
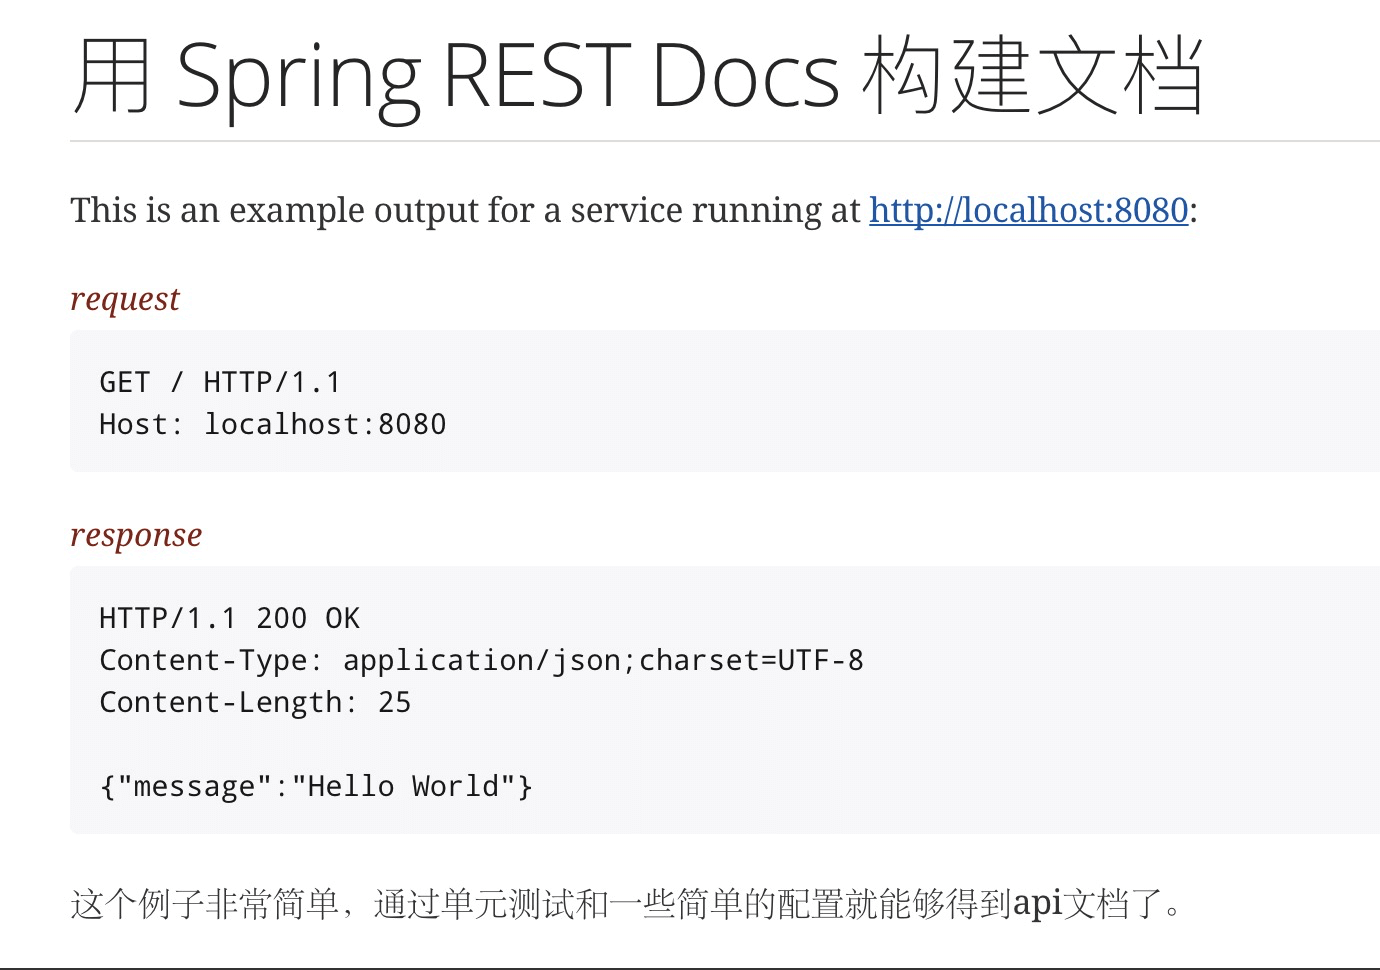
= 用 Spring REST Docs 构建文档

This is an example output for a service running at http://localhost:8080:

.request
include::{snippets}/home/http-request.adoc[]

.response
include::{snippets}/home/http-response.adoc[]

这个例子非常简单,通过单元测试和一些简单的配置就能够得到api文档了。
adoc的书写格式,参考:http://docs.spring.io/spring-restdocs/docs/current/reference/html5/,这里不多讲解。
需要使用asciidoctor-maven-plugin插件,在其pom文件加上:
<plugin>
    <groupId>org.asciidoctor</groupId>
    <artifactId>asciidoctor-maven-plugin</artifactId>
    <executions>
        <execution>
            <id>generate-docs</id>
            <phase>prepare-package</phase>
            <goals>
                <goal>process-asciidoc</goal>
            </goals>
            <configuration>
                <sourceDocumentName>index.adoc</sourceDocumentName>
                <backend>html</backend>
                <attributes>
                    <snippets>${project.build.directory}/snippets</snippets>
                </attributes>
            </configuration>
        </execution>
    </executions>
</plugin>
这时只需要通过mvnw package命令就可以生成文档了。
在/target/generated-docs下有个index.html,打开这个html,显示如下,界面还算简洁:

结语
通过单元测试,生存adoc文件,再用adoc文件生存html,只需要简单的几步就可以生成一个api文档的html文件,这个html文件你可以通网站发布出去。整个过程很简单,对代码无任何影响。
源码下载:https://github.com/forezp/SpringBootLearning
参考资料
http://docs.spring.io/spring-restdocs/docs/current/reference/html5/
看完两件小事
如果你觉得这篇文章对你挺有启发,我想请你帮我两个小忙:
- 把这篇文章分享给你的朋友 / 交流群,让更多的人看到,一起进步,一起成长!
- 关注公众号 「方志朋」,公众号后台回复「666」 免费领取我精心整理的进阶资源教程

本文著作权归作者所有,如若转载,请注明出处
转载请注明:文章转载自「 Java极客技术学习 」https://www.javajike.com
 微信扫一扫
微信扫一扫